Integration of GCP with nOps
FAQs
Expand FAQs
1. What if I don’t see my billing data in BigQuery?
- Ensure that Billing Export is enabled for the correct project.
- Check if the dataset and table names match what was configured in nOps.
- Wait up to 48 hours for the first full dataset to appear.
2. Can I use customer-managed encryption keys?
No, Google Cloud only supports Google-managed encryption for billing data exports.
3. How often is billing data updated on nOps?
Billing data is refreshed daily, but there might be a 48-hour delay for full updates.
4. How long does it take for the Pricing and Detailed Resource tables to be available?
The tables under the Detailed Usage Cost and Pricing exports may take up to 48 hours to be created.
5. Do all exports need to be in the same location?
Yes. The Detailed Usage Cost and Pricing exports must be configured to use the same location (US or EU) and preferably the same project. Using different locations will cause integration issues with nOps.
6. Why do I need to grant permissions at three different levels (Organization, Billing Account, Project)?
Each level provides different types of access:
- Organization-level roles allow nOps to discover and analyze resources across all projects in your organization (e.g., Compute instances, GKE clusters, recommendations).
- Billing Account-level role is required to access billing metadata and currency information. This cannot be granted at the project level.
- Project-level roles provide access to the BigQuery dataset containing your cost export data.
Granting roles only at one level will result in incomplete data or integration failures.
Setting Up the Integration
To integrate GCP with nOps, follow these steps:
Before proceeding, ensure you have completed the Prerequisites including:
- Checking if billing exports are already enabled
- Configuring GCP billing exports (if not already enabled)
- Understanding domain restricted sharing requirements (if applicable)
1. Link GCP Billing Data to nOps
Watch: Linking GCP Billing Data to nOps
Once billing exports are configured in GCP, connect them to nOps.
- Log in to nOps and navigate to the GCP Integration page.
- Enter the required information:
- GCP Billing Account ID
- BigQuery Dataset ID for Detailed Usage Cost
- BigQuery Dataset ID for Pricing Export
- BigQuery Dataset ID for Committed Use Discounts Export
- Click Create Integration.
Billing Account ID:
- Console
- gcloud CLI
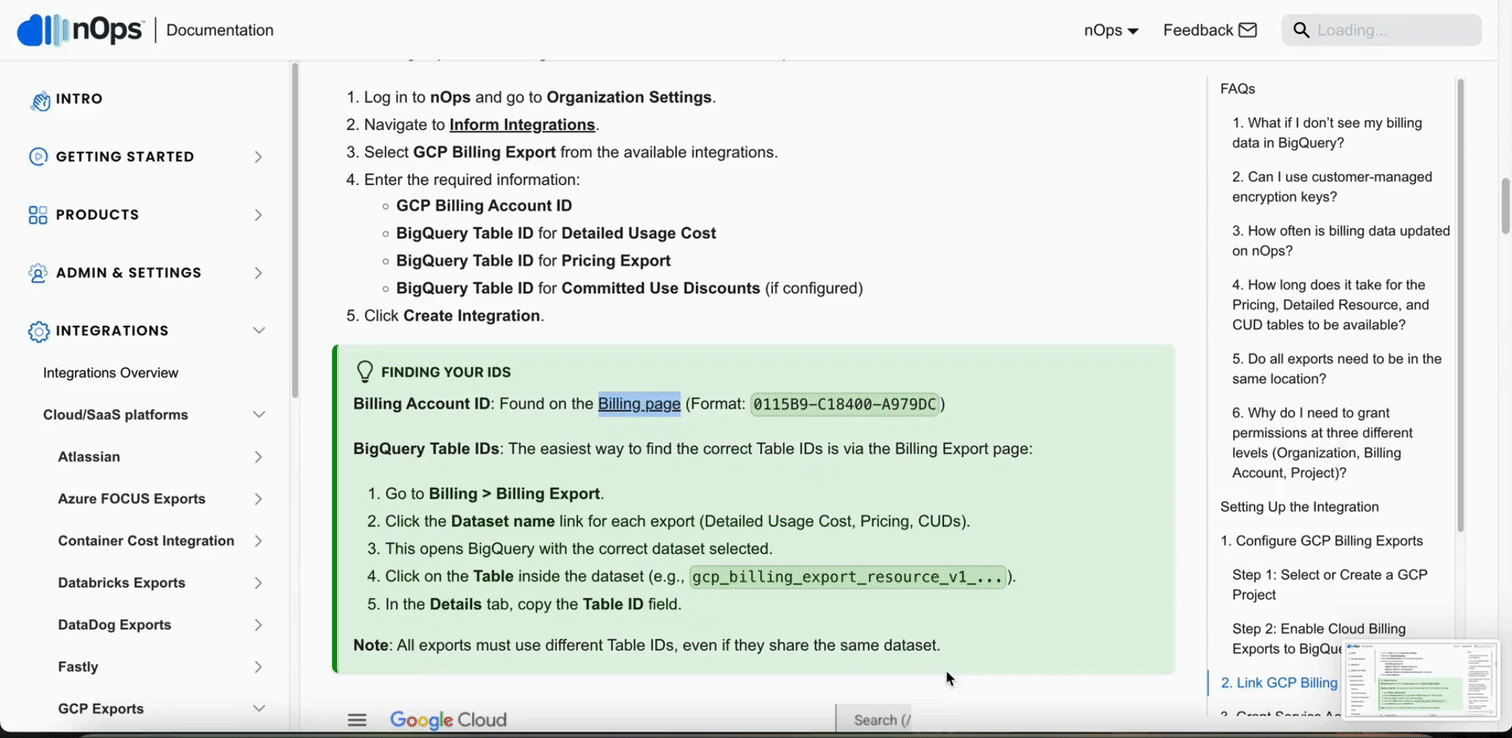
Found on the Billing page (Format: 0115B9-C18400-A979DC)

gcloud billing accounts list
BigQuery Dataset IDs:
- Go to Billing > Billing Export. You may need to select your billing account first if prompted.
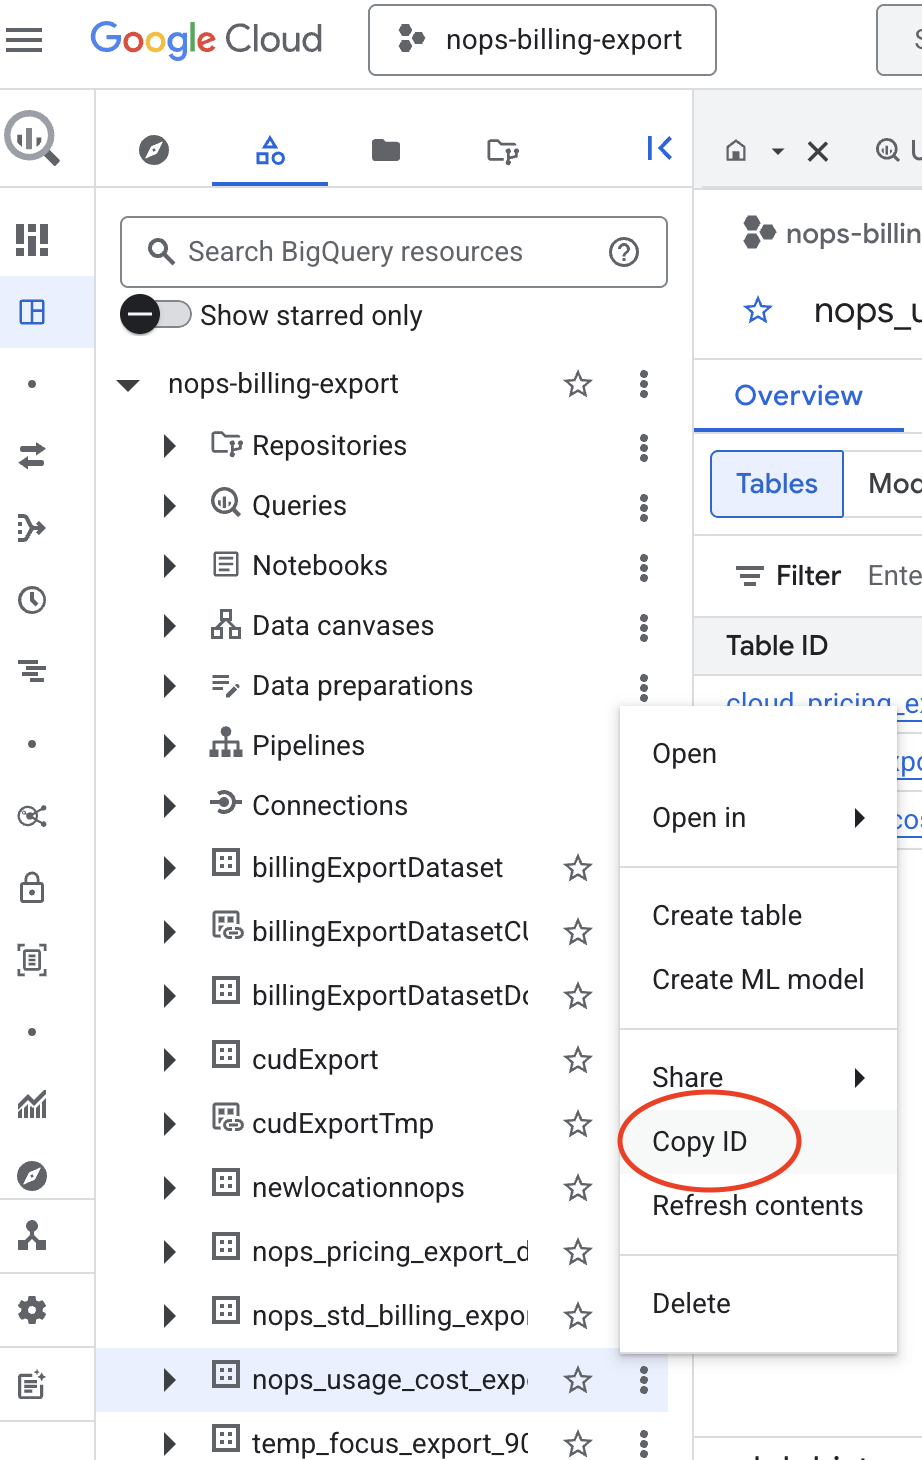
- For each export (Detailed Usage Cost, Pricing, and Committed Use Discounts), click on the Dataset name link to open the dataset in BigQuery.
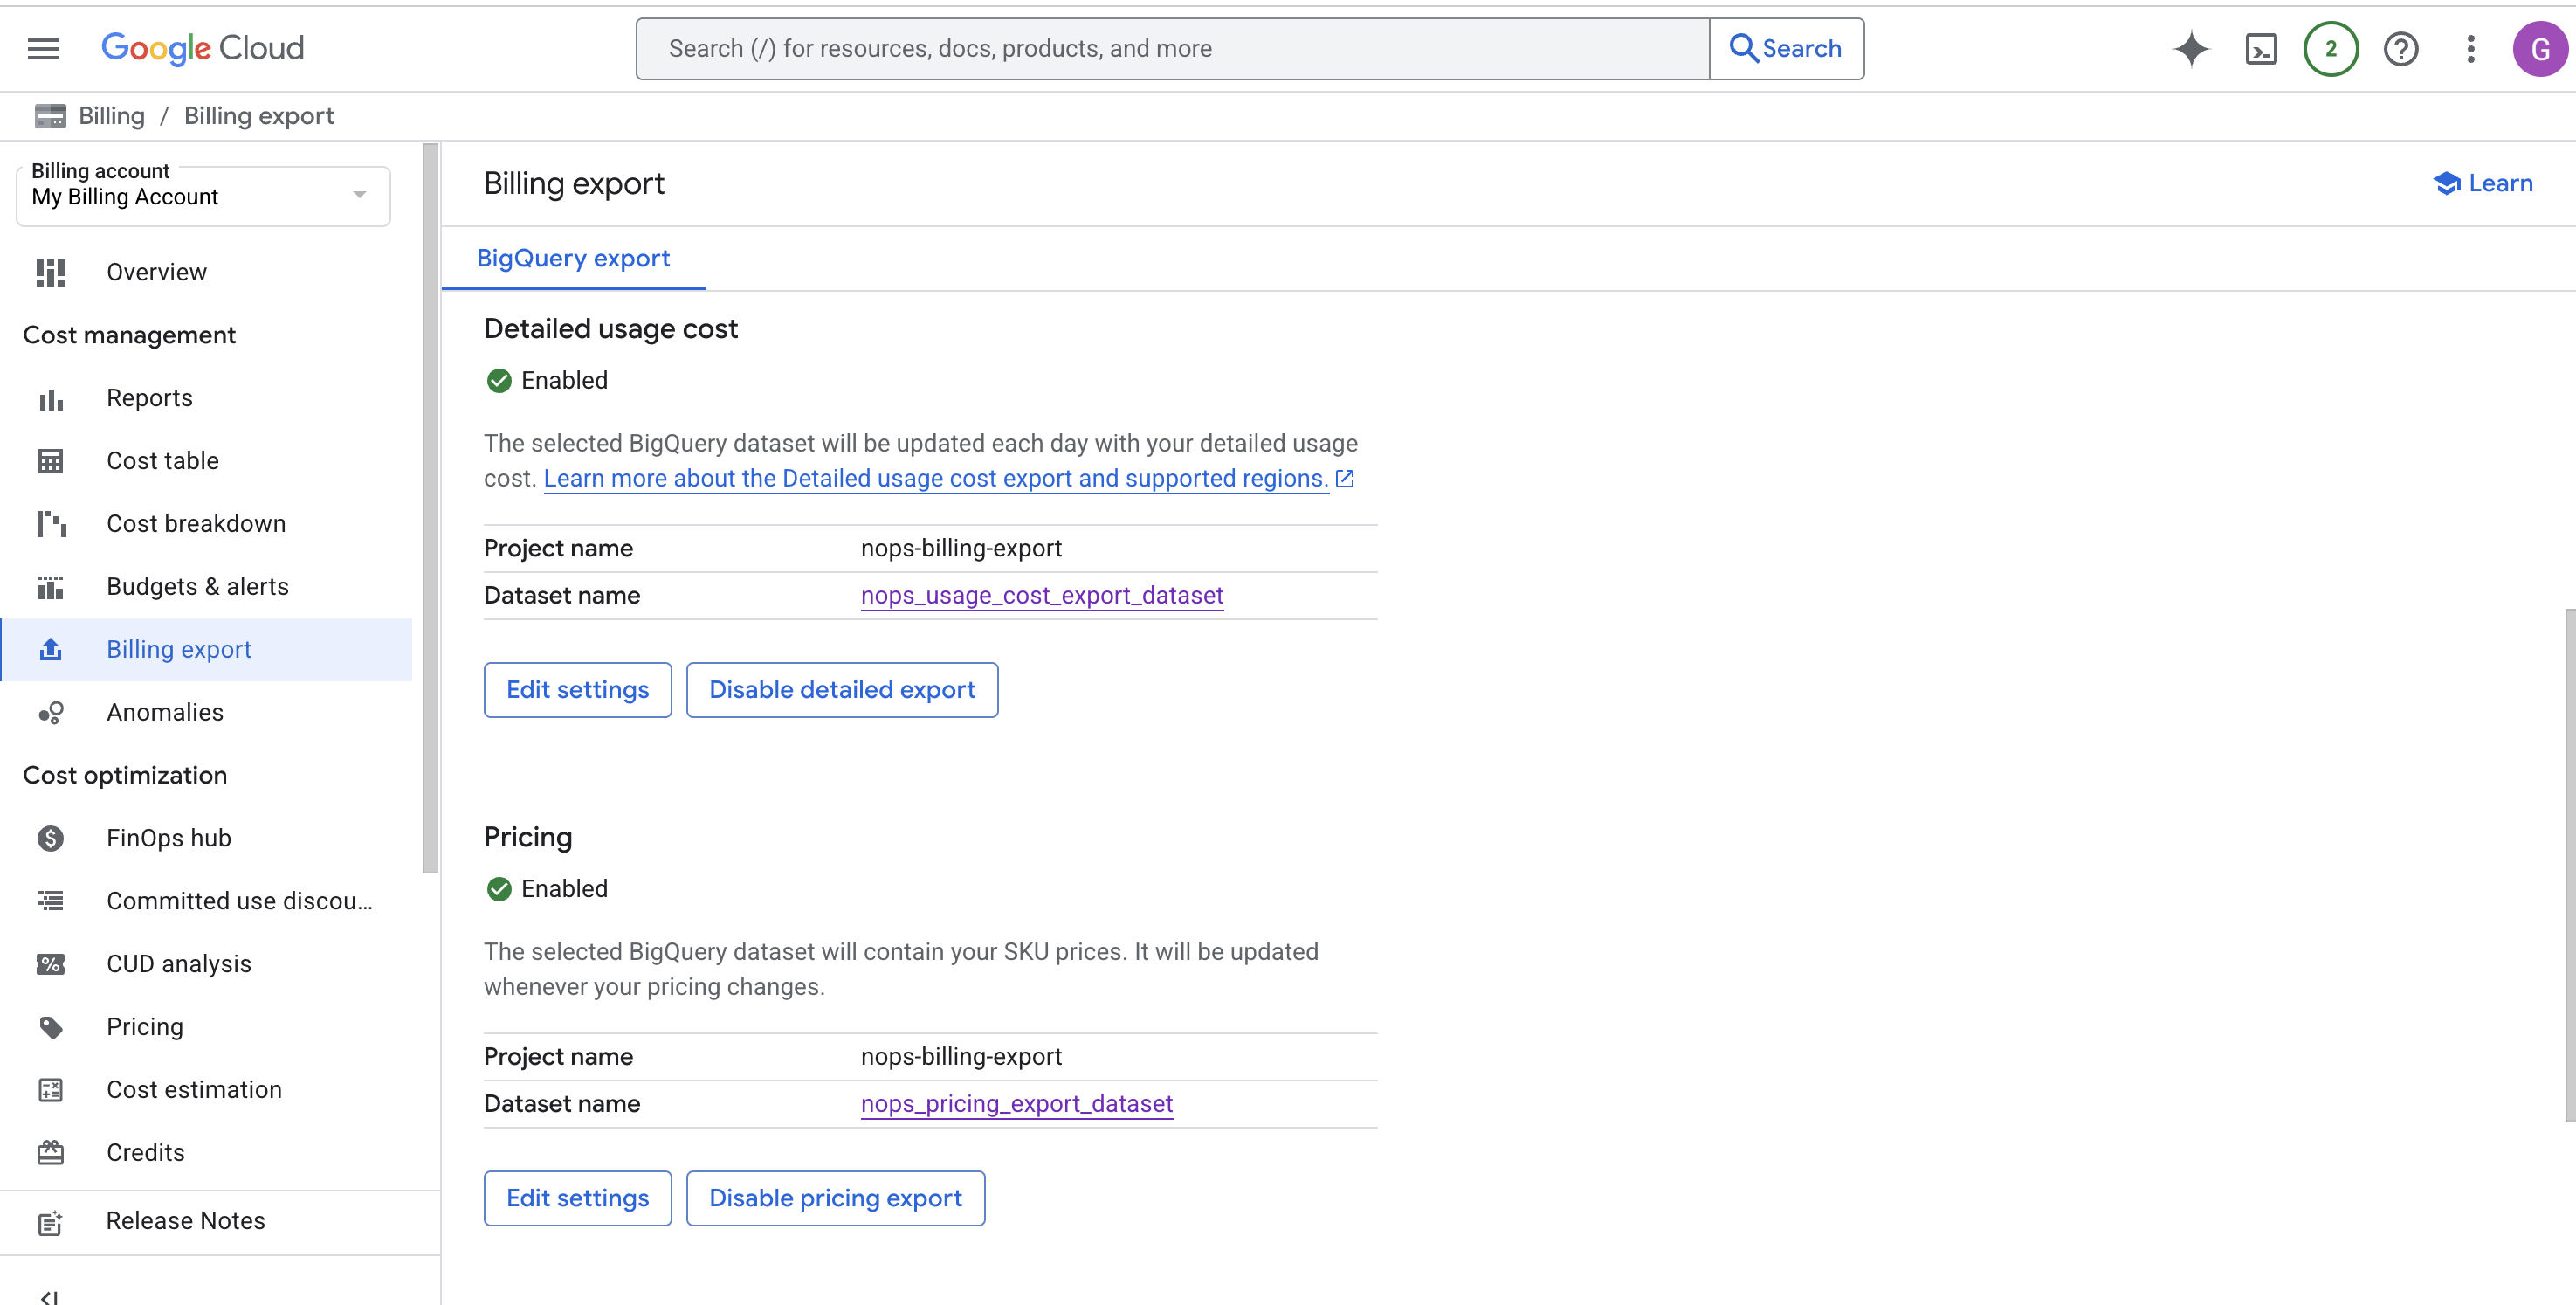
- In BigQuery, click on the three vertical dots (⋮) next to the dataset name.
- Select Copy ID to copy the full Dataset ID (e.g.,
my-billing-project.gcp_billing_exports).
Tip: If all exports share the same dataset, you only need to copy the ID once — use the same Dataset ID for all fields in nOps.
After completing this step, nOps will generate a service account email. Copy this email address — you will need it in the next section to grant permissions.

2. Grant Service Account Permissions in GCP
Once the nOps service account email is generated, grant it the required permissions. Permissions must be granted at three different levels: Organization, Billing Account, and Project.
The nOps service account requires permissions at multiple levels. Granting roles only at the project level will not provide sufficient access for full cost visibility and recommendations.
If your GCP organization has Domain Restricted Sharing enabled, you may need to add the nOps Customer ID to your allowed domains before granting permissions. See the Prerequisites page for detailed instructions.
A. Organization-Level Roles
Watch: Granting Organization IAM Roles

These roles provide visibility across your entire GCP organization for asset discovery, recommendations, and resource enumeration.
Required Roles:
- Cloud Asset Viewer (
roles/cloudasset.viewer) – To enumerate assets across services for correlation. - Browser (
roles/browser) – To enumerate projects and folders. - Recommender Viewer (
roles/recommender.viewer) – To read cost recommendations (e.g., rightsizing, idle resources). - Logs Viewer (
roles/logging.viewer) – To read logs for resource analysis. - Compute Viewer (
roles/compute.viewer) – To read Compute Engine data (CUDs, instances, regions). - Cloud SQL Viewer (
roles/cloudsql.viewer) – To read Cloud SQL instances and configurations. - Cloud Run Viewer (
roles/run.viewer) – To read Cloud Run services and configurations.
- Console
- gcloud CLI
- Terraform
Step 1: Navigate to Organization IAM
- Go to IAM & Admin → IAM in the Google Cloud Console.
- At the top of the page, use the project/organization selector to switch to your Organization (not a specific project).
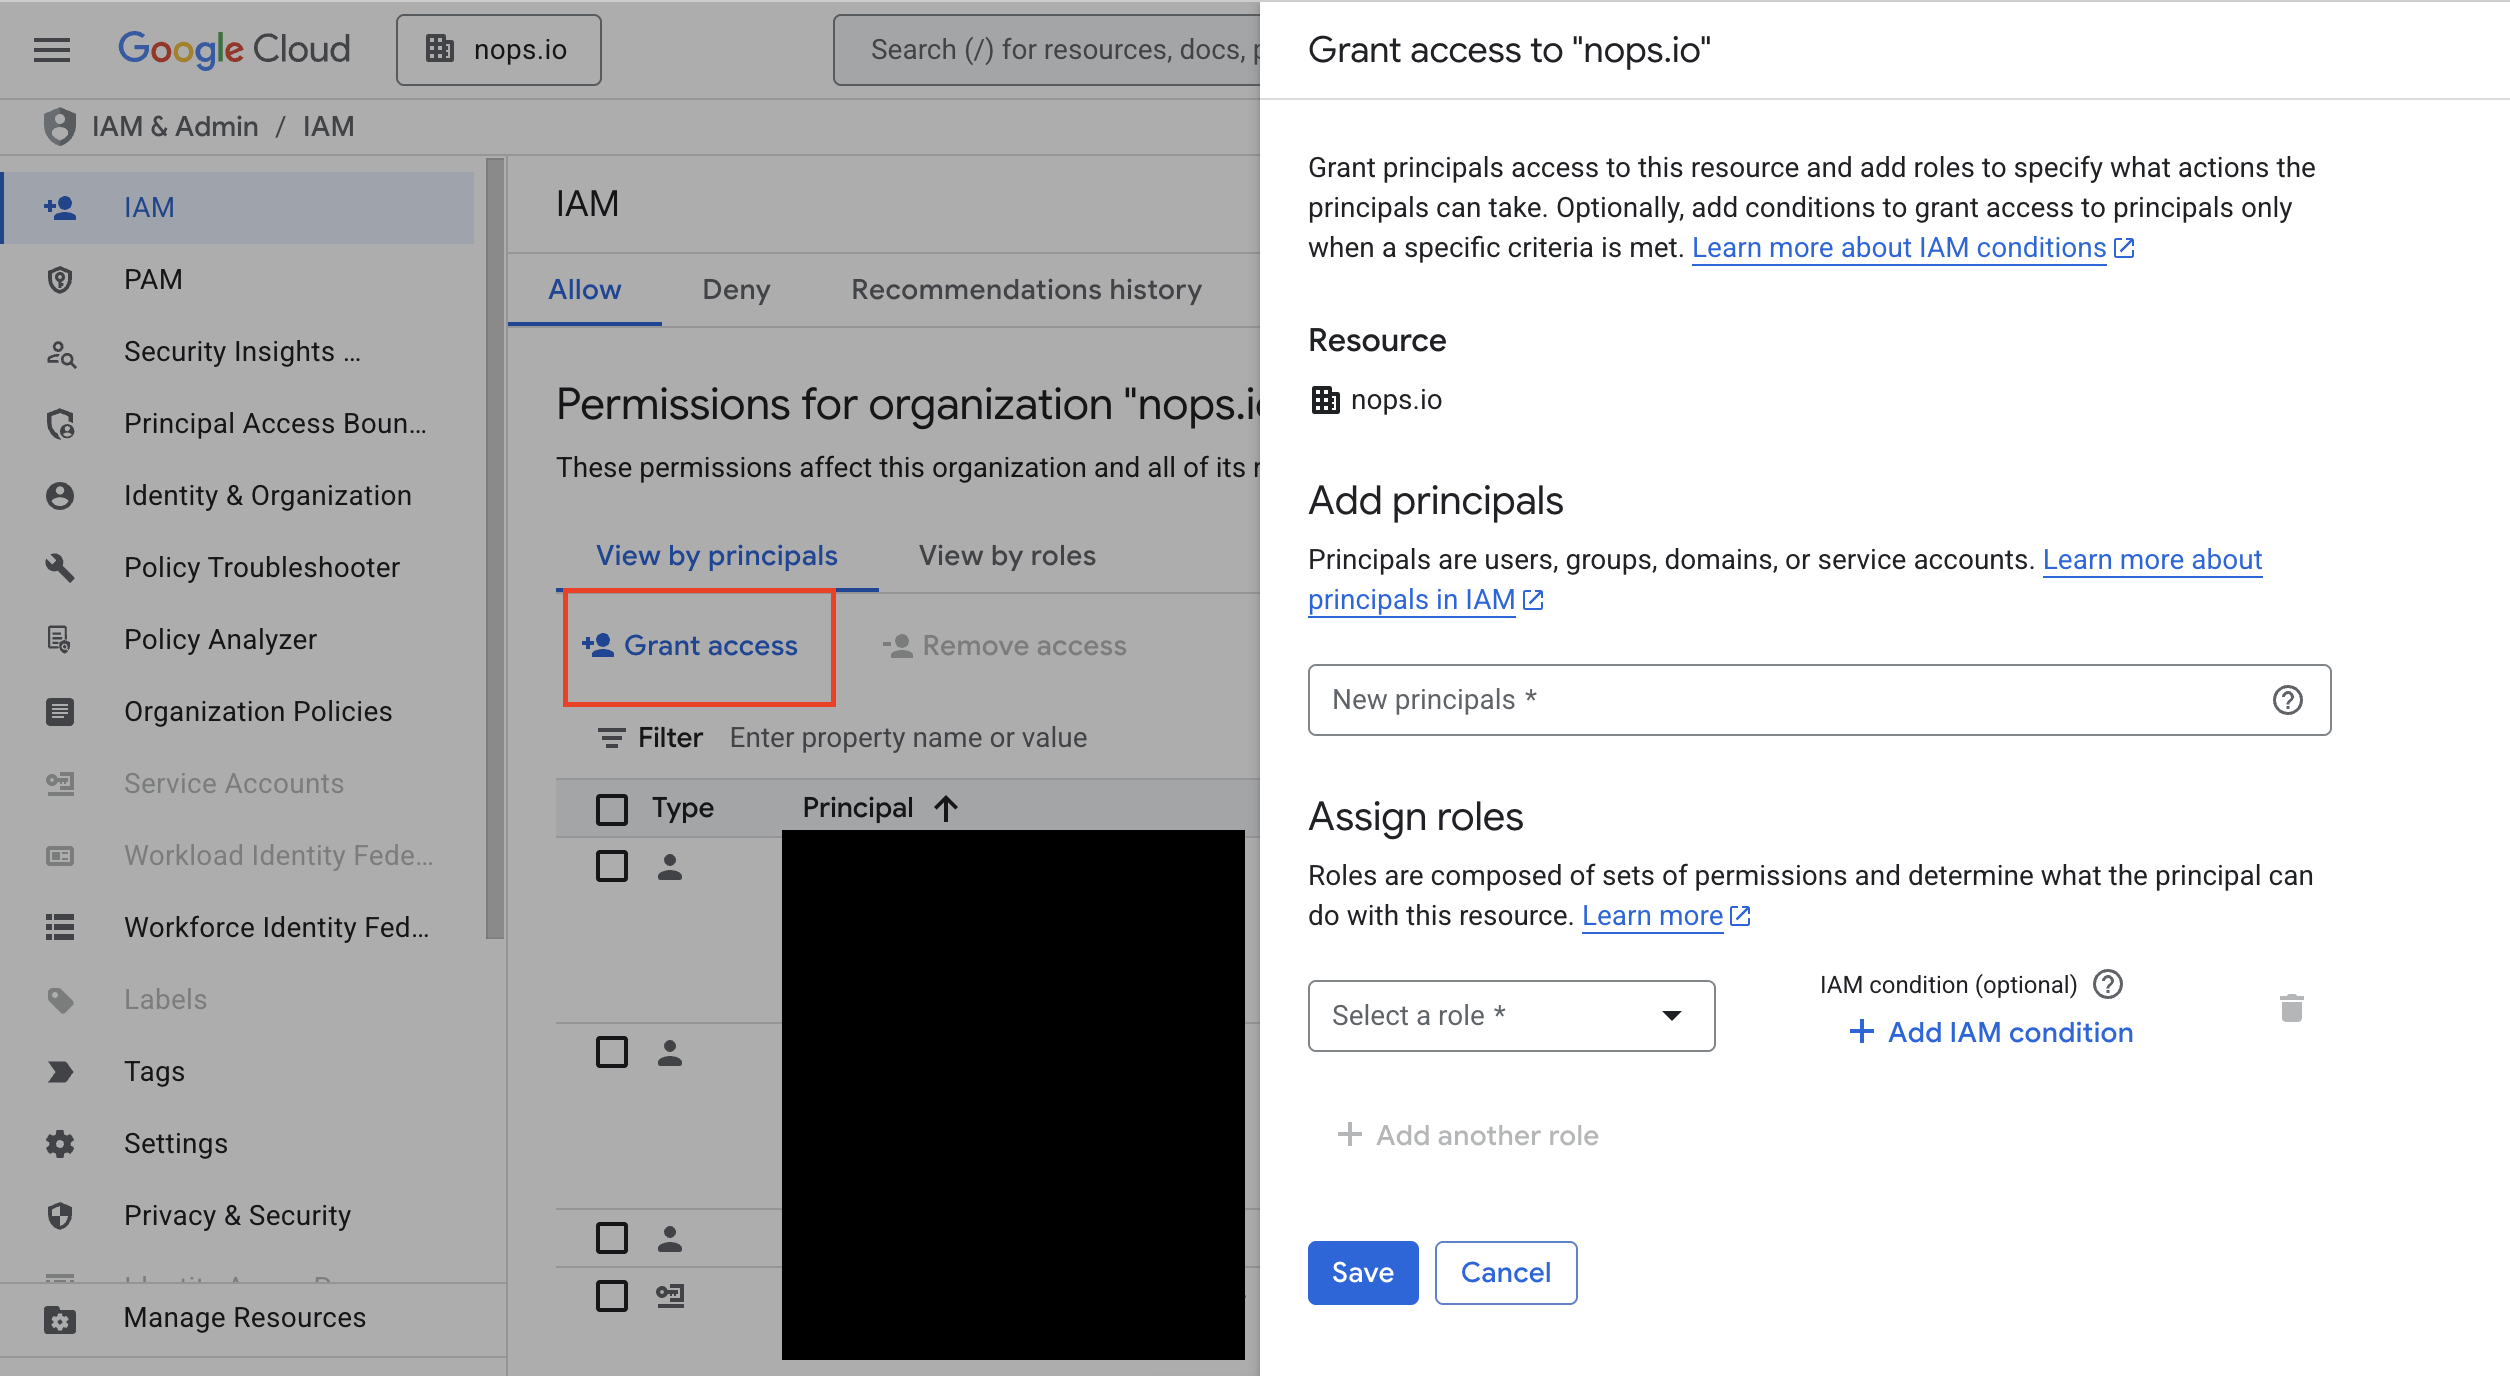
Step 2: Grant Access to nOps Service Account
- Click + Grant Access.
- In the New principals field, enter the nOps service account email (obtained from the integration setup).
- Add all the roles listed above.
- Click Save.
Set your configuration variables:
# Get your Organization ID
gcloud organizations list

# Replace with your values
NOPS_SERVICE_ACCOUNT="your-nops-sa@project.iam.gserviceaccount.com"
ORGANIZATION_ID="123456789012"  # Use the ID from the command above
Grant the required roles:
# Organization-level roles for fleet-wide visibility
ORG_ROLES=(
    "roles/cloudasset.viewer"
    "roles/browser"
    "roles/recommender.viewer"
    "roles/logging.viewer"
    "roles/compute.viewer"
    "roles/container.viewer"
    "roles/cloudsql.viewer"
    "roles/run.viewer"
)

echo "Granting Organization-level roles..."
for ROLE in "${ORG_ROLES[@]}"; do
    echo "  Granting $ROLE at org level..."
    gcloud organizations add-iam-policy-binding $ORGANIZATION_ID \
        --member="serviceAccount:$NOPS_SERVICE_ACCOUNT" \
        --role="$ROLE" \
        --quiet
done
The nOps Terraform module configures all required GCP permissions and APIs in a single step. Running the module below completes Sections 2A–2D and Section 3:
- Organization-level IAM roles (this section)
- Billing account-level IAM role (Section 2B)
- Dataset-level IAM roles (Section 2C)
- Project-level IAM role (Section 2D)
- Required APIs (Section 3)
Note: You must complete Step 1 (Link GCP Billing Data to nOps) first to obtain the service account email.
Step 1: Create Terraform Configuration
Create a main.tf file:
terraform {
  required_version = ">= 1.0"

  required_providers {
    google = {
      source  = "hashicorp/google"
      version = ">= 4.0"
    }
  }
}

provider "google" {
  # Uses Application Default Credentials
  # Run: gcloud auth application-default login
}

module "nops_gcp_integration" {
  source = "github.com/nops-io/terraform-gcp-nops-integration"

  # Required: Your GCP identifiers
  organization_id    = "123456789012"              # Your GCP Organization ID
  billing_account_id = "XXXXXX-XXXXXX-XXXXXX"      # Your Billing Account ID

  # Required: nOps service account (from Step 1)
  nops_service_account_email = "your-nops-sa@project.iam.gserviceaccount.com"

  # Required: BigQuery dataset IDs for billing exports
  bigquery_detailed_usage_cost_dataset_id    = "project-id:dataset_name"
  bigquery_pricing_dataset_id                = "project-id:dataset_name"
  bigquery_committed_use_discounts_dataset_id = "project-id:dataset_name"
}
Step 2: Apply Configuration
# Initialize Terraform
terraform init

# Review the plan
terraform plan

# Apply (type 'yes' to confirm)
terraform apply
Repository: github.com/nops-io/terraform-gcp-nops-integration
B. Billing Account-Level Role
Watch: Granting Billing Account IAM Role
This role is required for currency and billing metadata validation. It must be granted directly on the Billing Account.
Required Role: Billing Account Viewer (roles/billing.viewer)
Permissions granted in the standard Project IAM page do not propagate to the Billing Account. You must grant this role via the Billing console or gcloud CLI.
- Console
- gcloud CLI
- Terraform
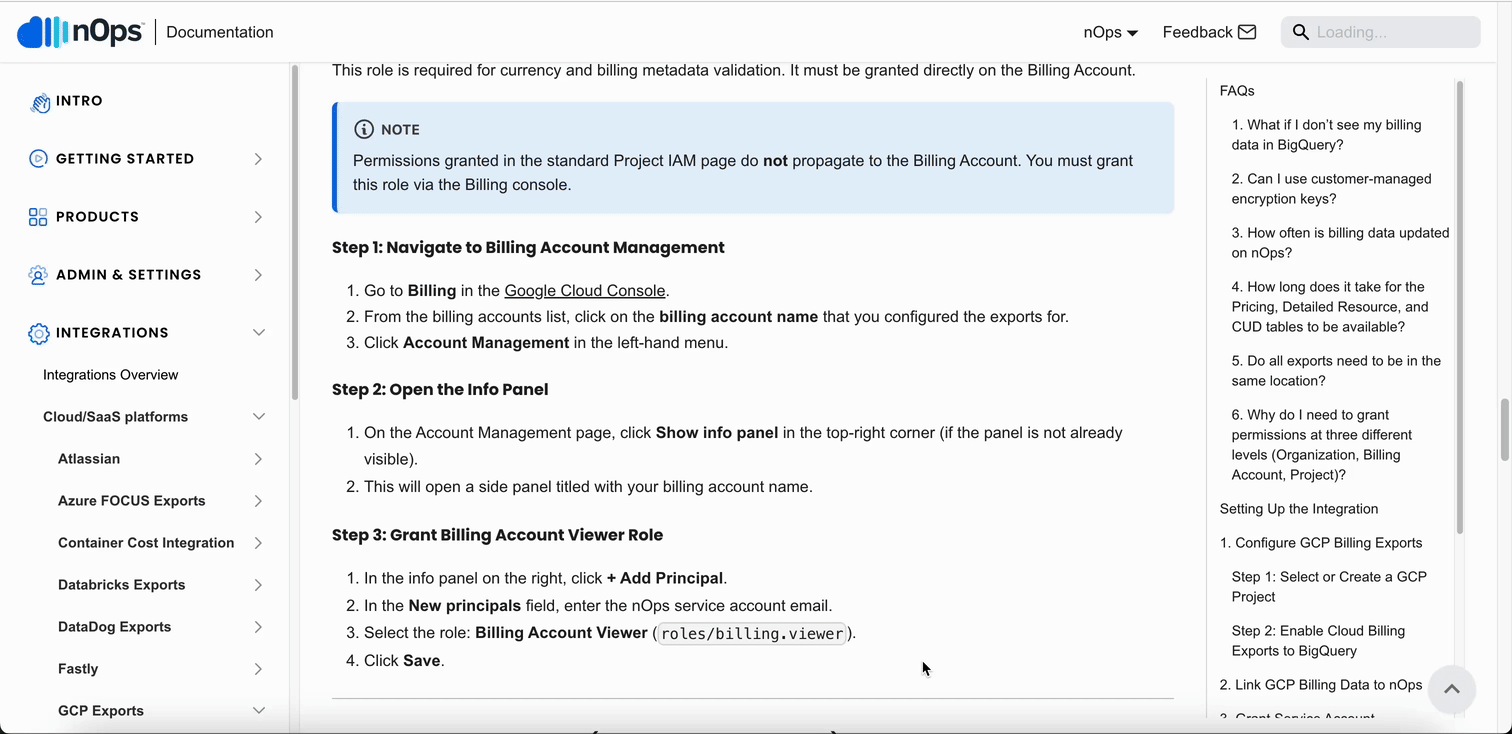
Step 1: Navigate to Billing Account Management
- Go to Billing in the Google Cloud Console.
- From the billing accounts list, click on the billing account name that you configured the exports for.
- Click Account Management in the left-hand menu.
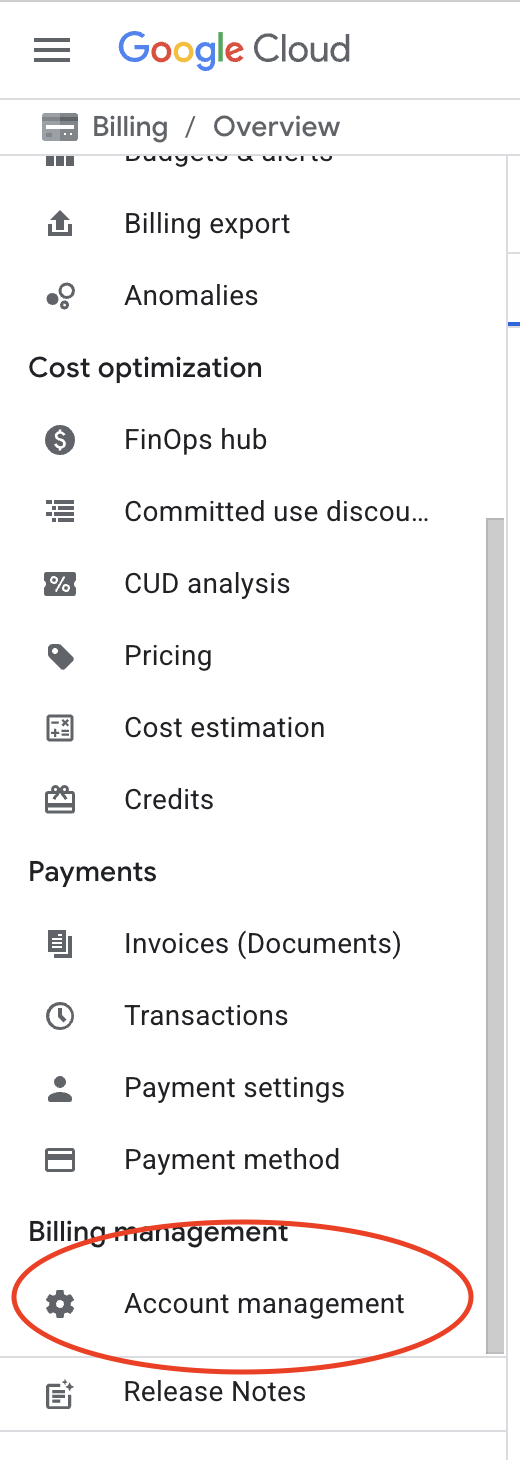
Step 2: Open the Info Panel
- On the Account Management page, click Show info panel in the top-right corner (if the panel is not already visible).
- This will open a side panel titled with your billing account name.
Step 3: Grant Billing Account Viewer Role
- In the info panel on the right, click + Add Principal.
- In the New principals field, enter the nOps service account email.
- Select the role: Billing Account Viewer (
roles/billing.viewer). - Click Save.

# Get your Billing Account ID
gcloud billing accounts list

# Replace with your values
NOPS_SERVICE_ACCOUNT="your-nops-sa@project.iam.gserviceaccount.com"
BILLING_ACCOUNT_ID="XXXXXX-XXXXXX-XXXXXX"  # Use the ID from the command above
Grant the Billing Account Viewer role:
gcloud billing accounts add-iam-policy-binding $BILLING_ACCOUNT_ID \
    --member="serviceAccount:$NOPS_SERVICE_ACCOUNT" \
    --role="roles/billing.viewer" \
    --quiet
If you used the Terraform module in Section 2A, this step is already complete. The module automatically grants roles/billing.viewer on your billing account when you provide the billing_account_id variable.
C. Dataset-Level Roles (Cost Export Datasets)
Watch: Granting Dataset Permissions
These roles are required for reading BigQuery billing data and must be granted on each dataset that contains your cost export data:
- Detailed Usage Cost dataset
- Pricing dataset
- Committed Use Discounts dataset
Required Role: BigQuery Data Viewer (roles/bigquery.dataViewer)
If you configured all exports to use the same dataset, you only need to grant the permissions once on that shared dataset. Skip the other dataset steps if they share the same dataset as Detailed Usage Cost.
- Console
- Terraform
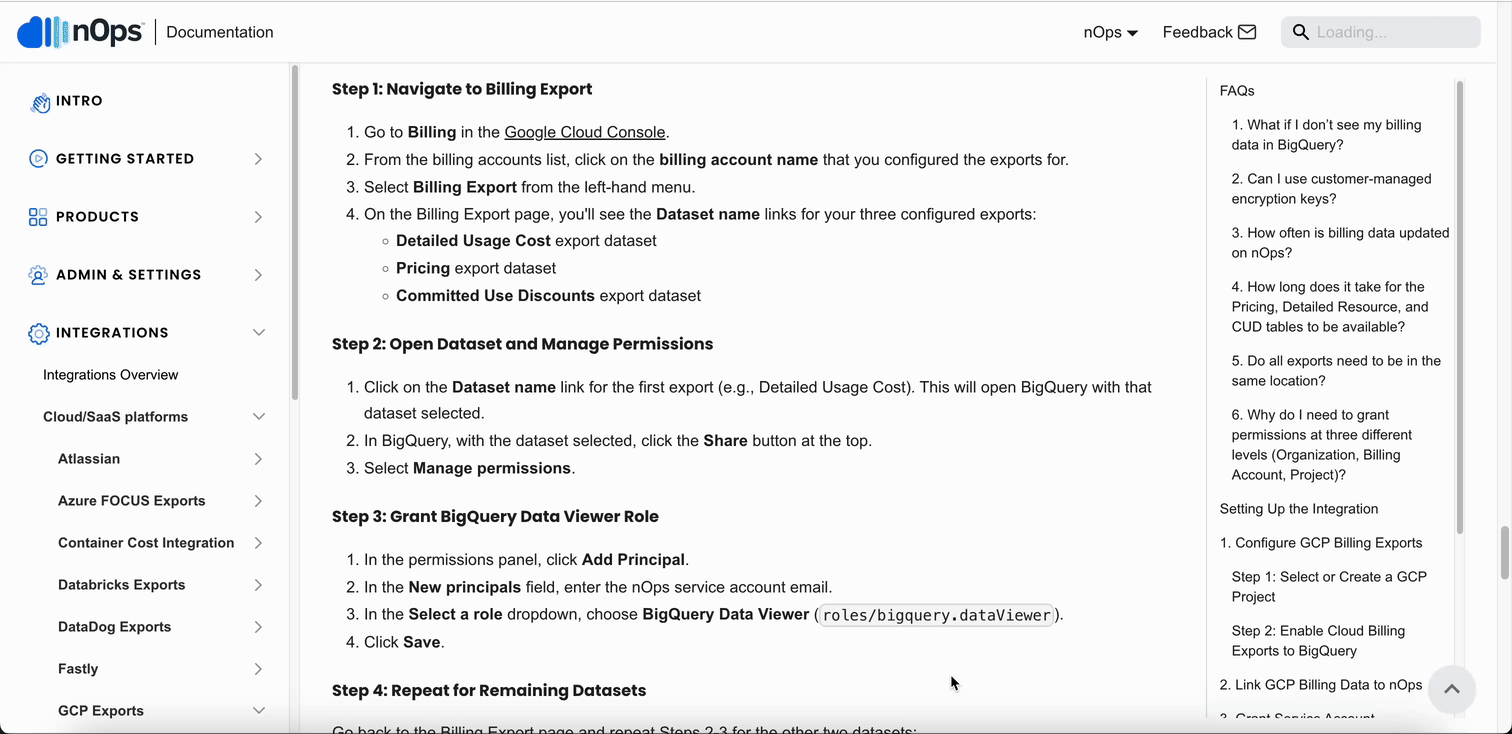
Step 1: Navigate to Billing Export
- Go to Billing in the Google Cloud Console.
- From the billing accounts list, click on the billing account name that you configured the exports for.
- Select Billing Export from the left-hand menu.
- On the Billing Export page, you'll see the Dataset name links for your configured exports.
Step 2: Open Dataset and Manage Permissions
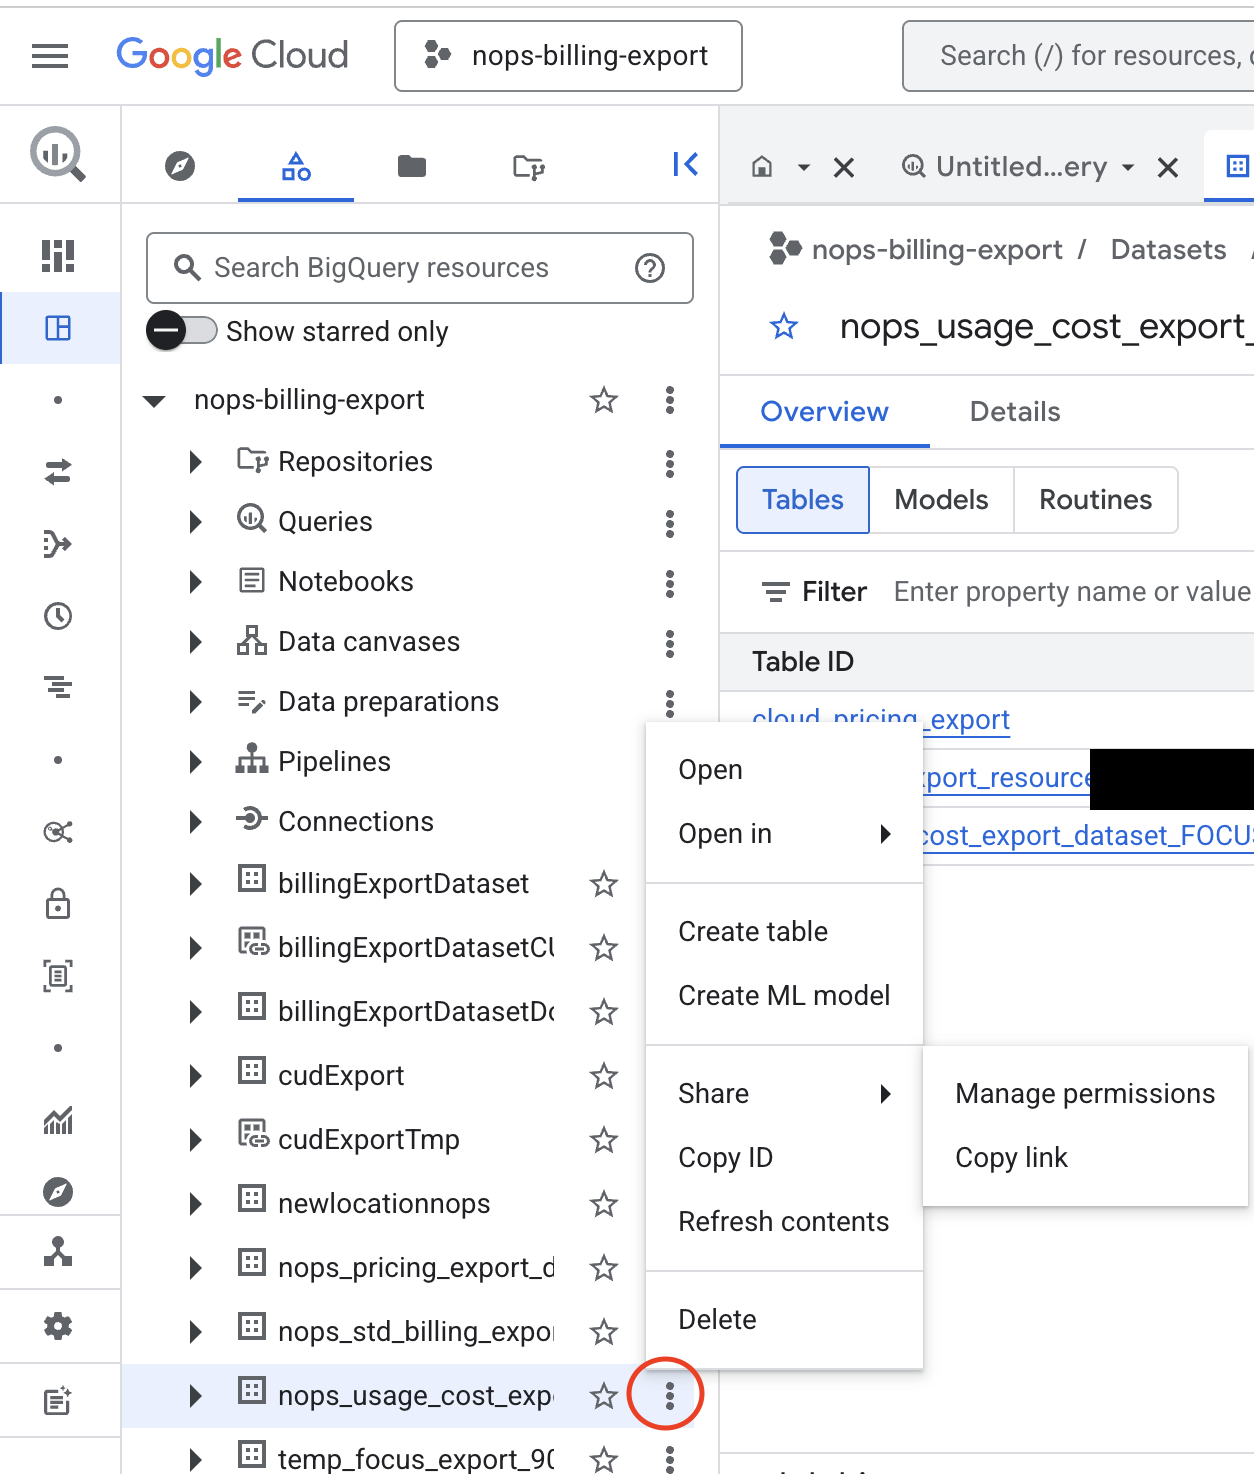
- Click on the Dataset name link for the first export (e.g., Detailed Usage Cost). This will open BigQuery with that dataset selected.
- In BigQuery, click on the three vertical dots (⋮) next to the dataset name in the left panel.
- Hover over Share and select Manage permissions.
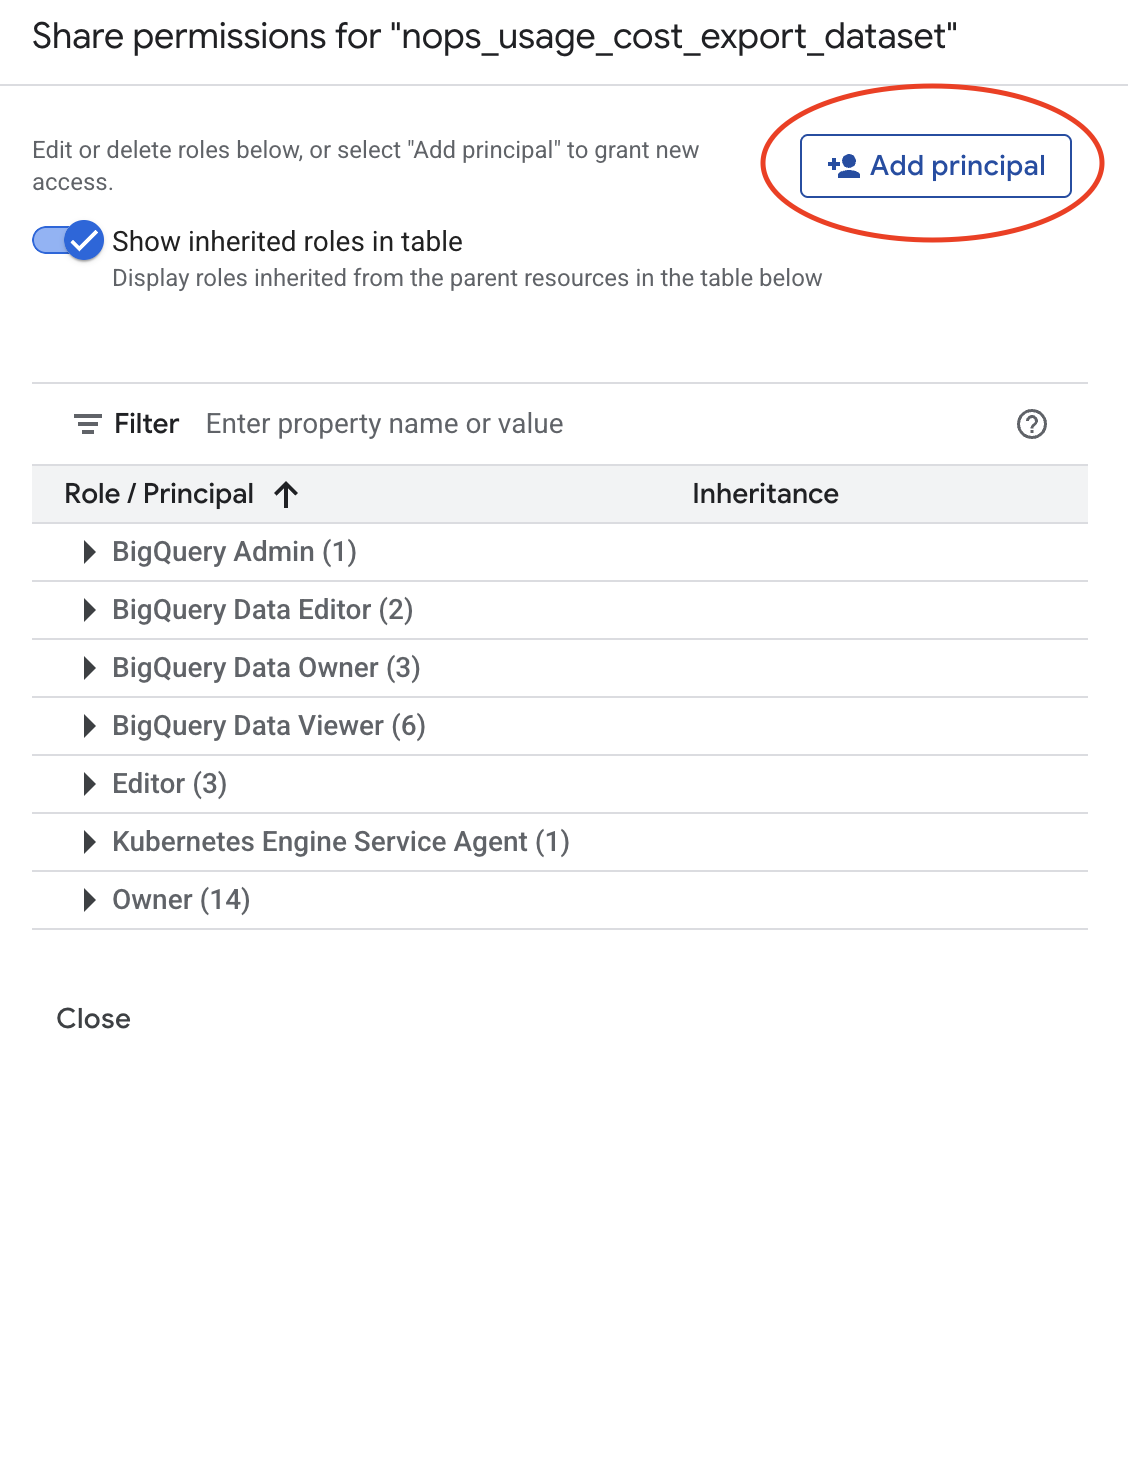
Step 3: Grant BigQuery Data Viewer Role
- In the permissions panel, click Add Principal.
- In the New principals field, enter the nOps service account email.
- In the Select a role dropdown, choose BigQuery Data Viewer (
roles/bigquery.dataViewer).
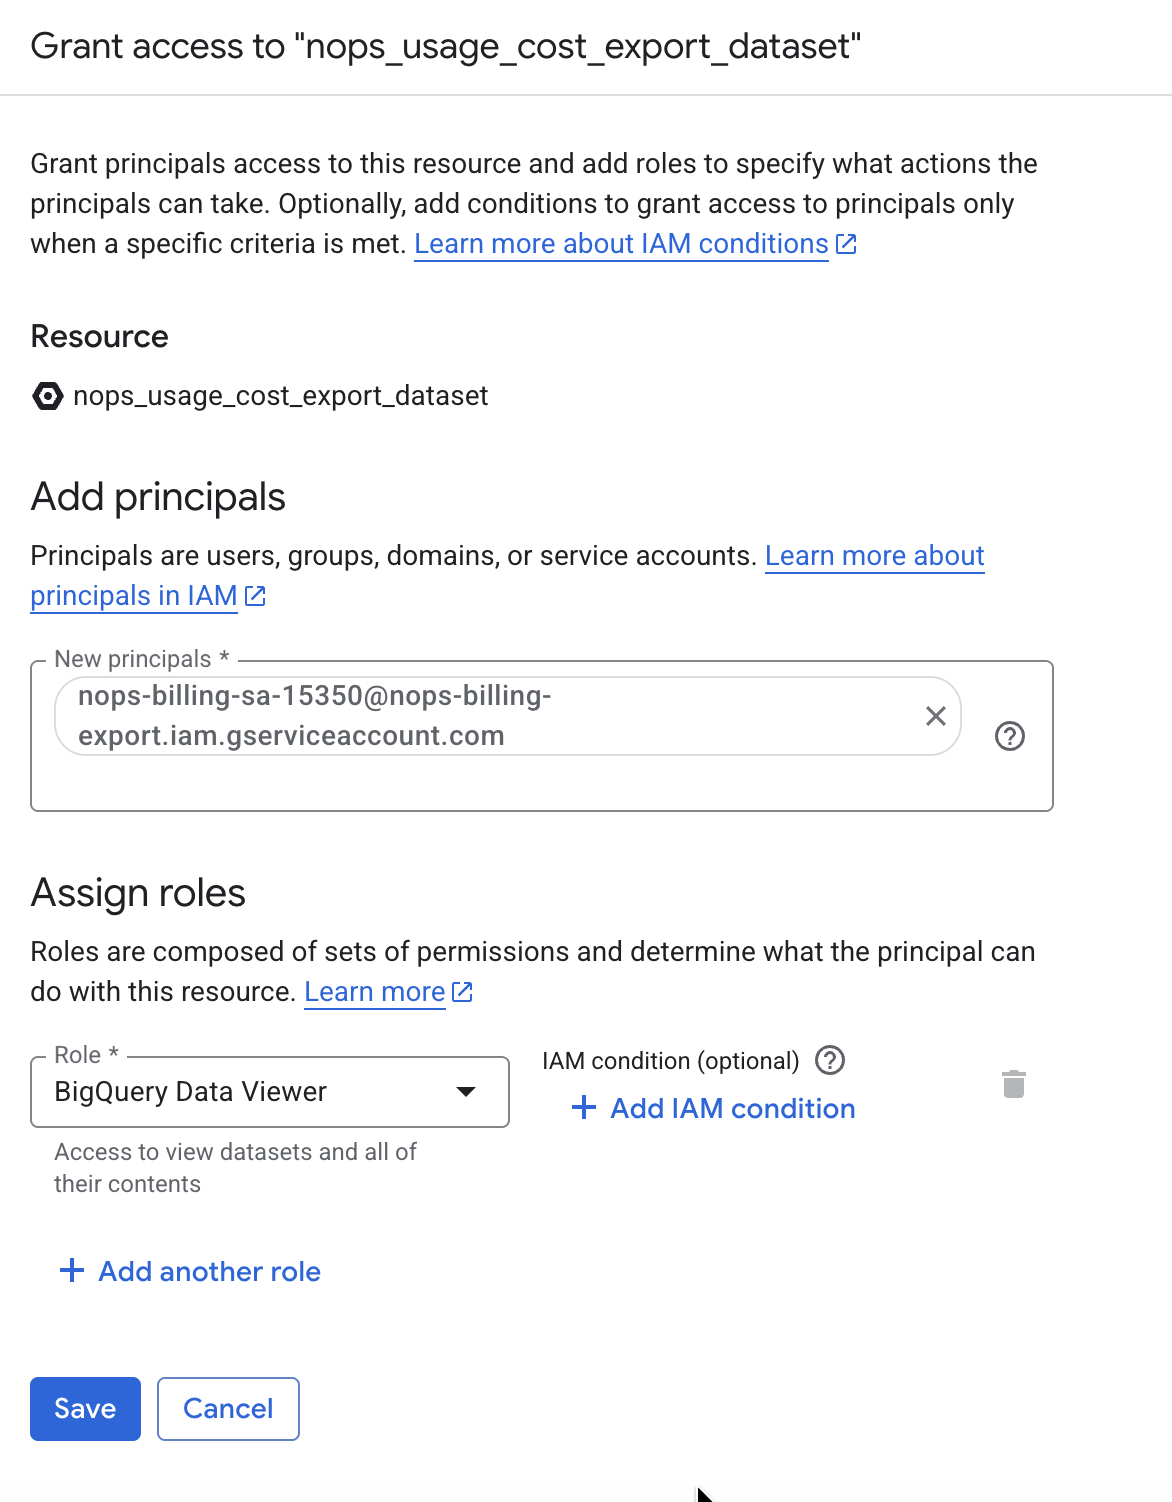
- Click Save.
Step 4: Repeat for Other Datasets (if different)
If your Pricing or Committed Use Discounts exports use different datasets than Detailed Usage Cost, go back to the Billing Export page and repeat Steps 2-3 for each additional export dataset.
If all exports share the same dataset, you can skip this step — permissions are already granted.
If you used the Terraform module in Section 2A, this step is already complete. The module automatically grants roles/bigquery.dataViewer on all three billing export datasets when you provide the dataset ID variables:
bigquery_detailed_usage_cost_dataset_idbigquery_pricing_dataset_idbigquery_committed_use_discounts_dataset_id
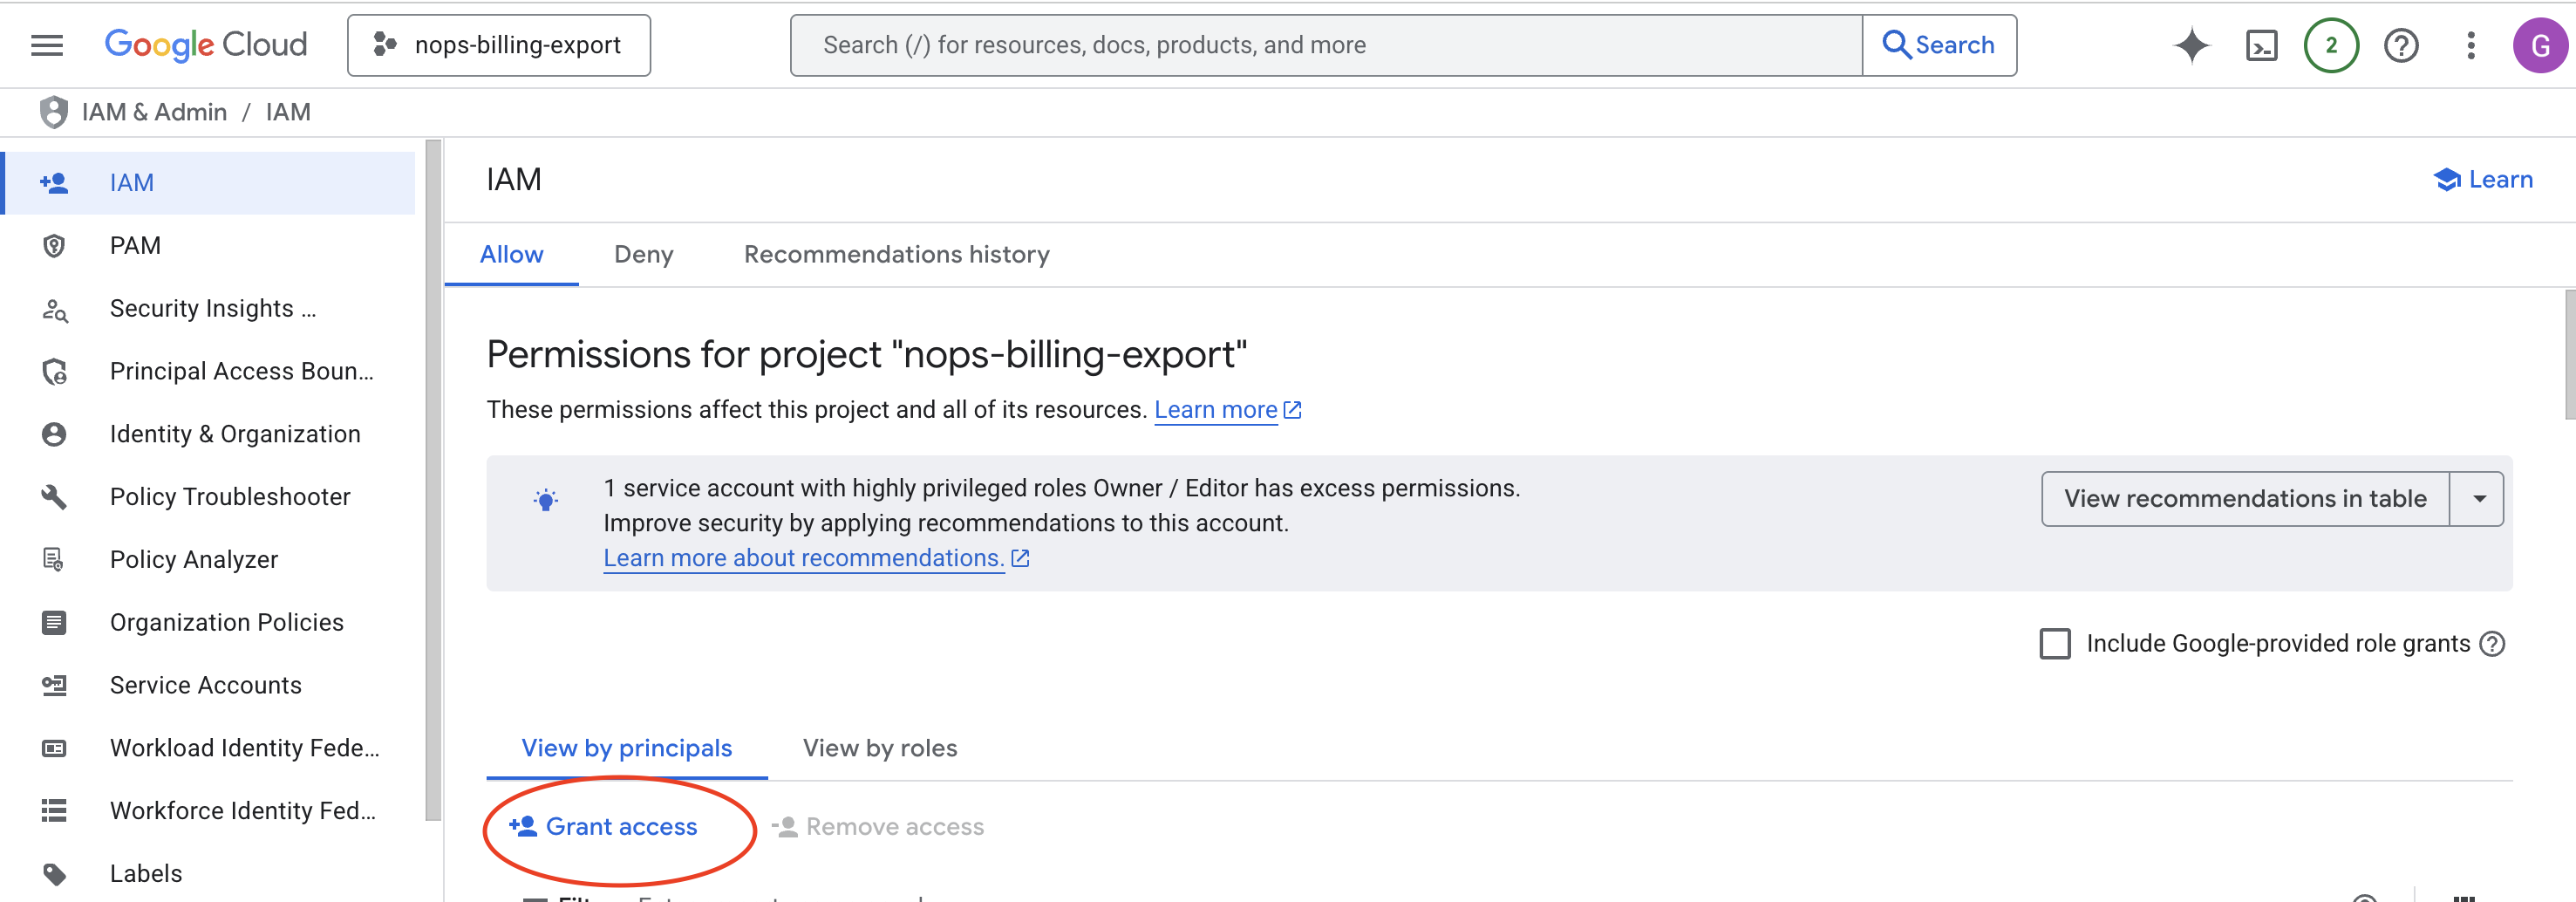
D. Project-Level Service Usage Role
The Service Usage Consumer role must be granted on the project that hosts your billing exports.
Required Role: Service Usage Consumer (roles/serviceusage.serviceUsageConsumer)
- Console
- gcloud CLI
- Terraform
- Go to IAM & Admin → IAM in the Google Cloud Console.
- Select the project that hosts your billing exports (where your BigQuery billing export dataset is located).
- Click + Grant Access.
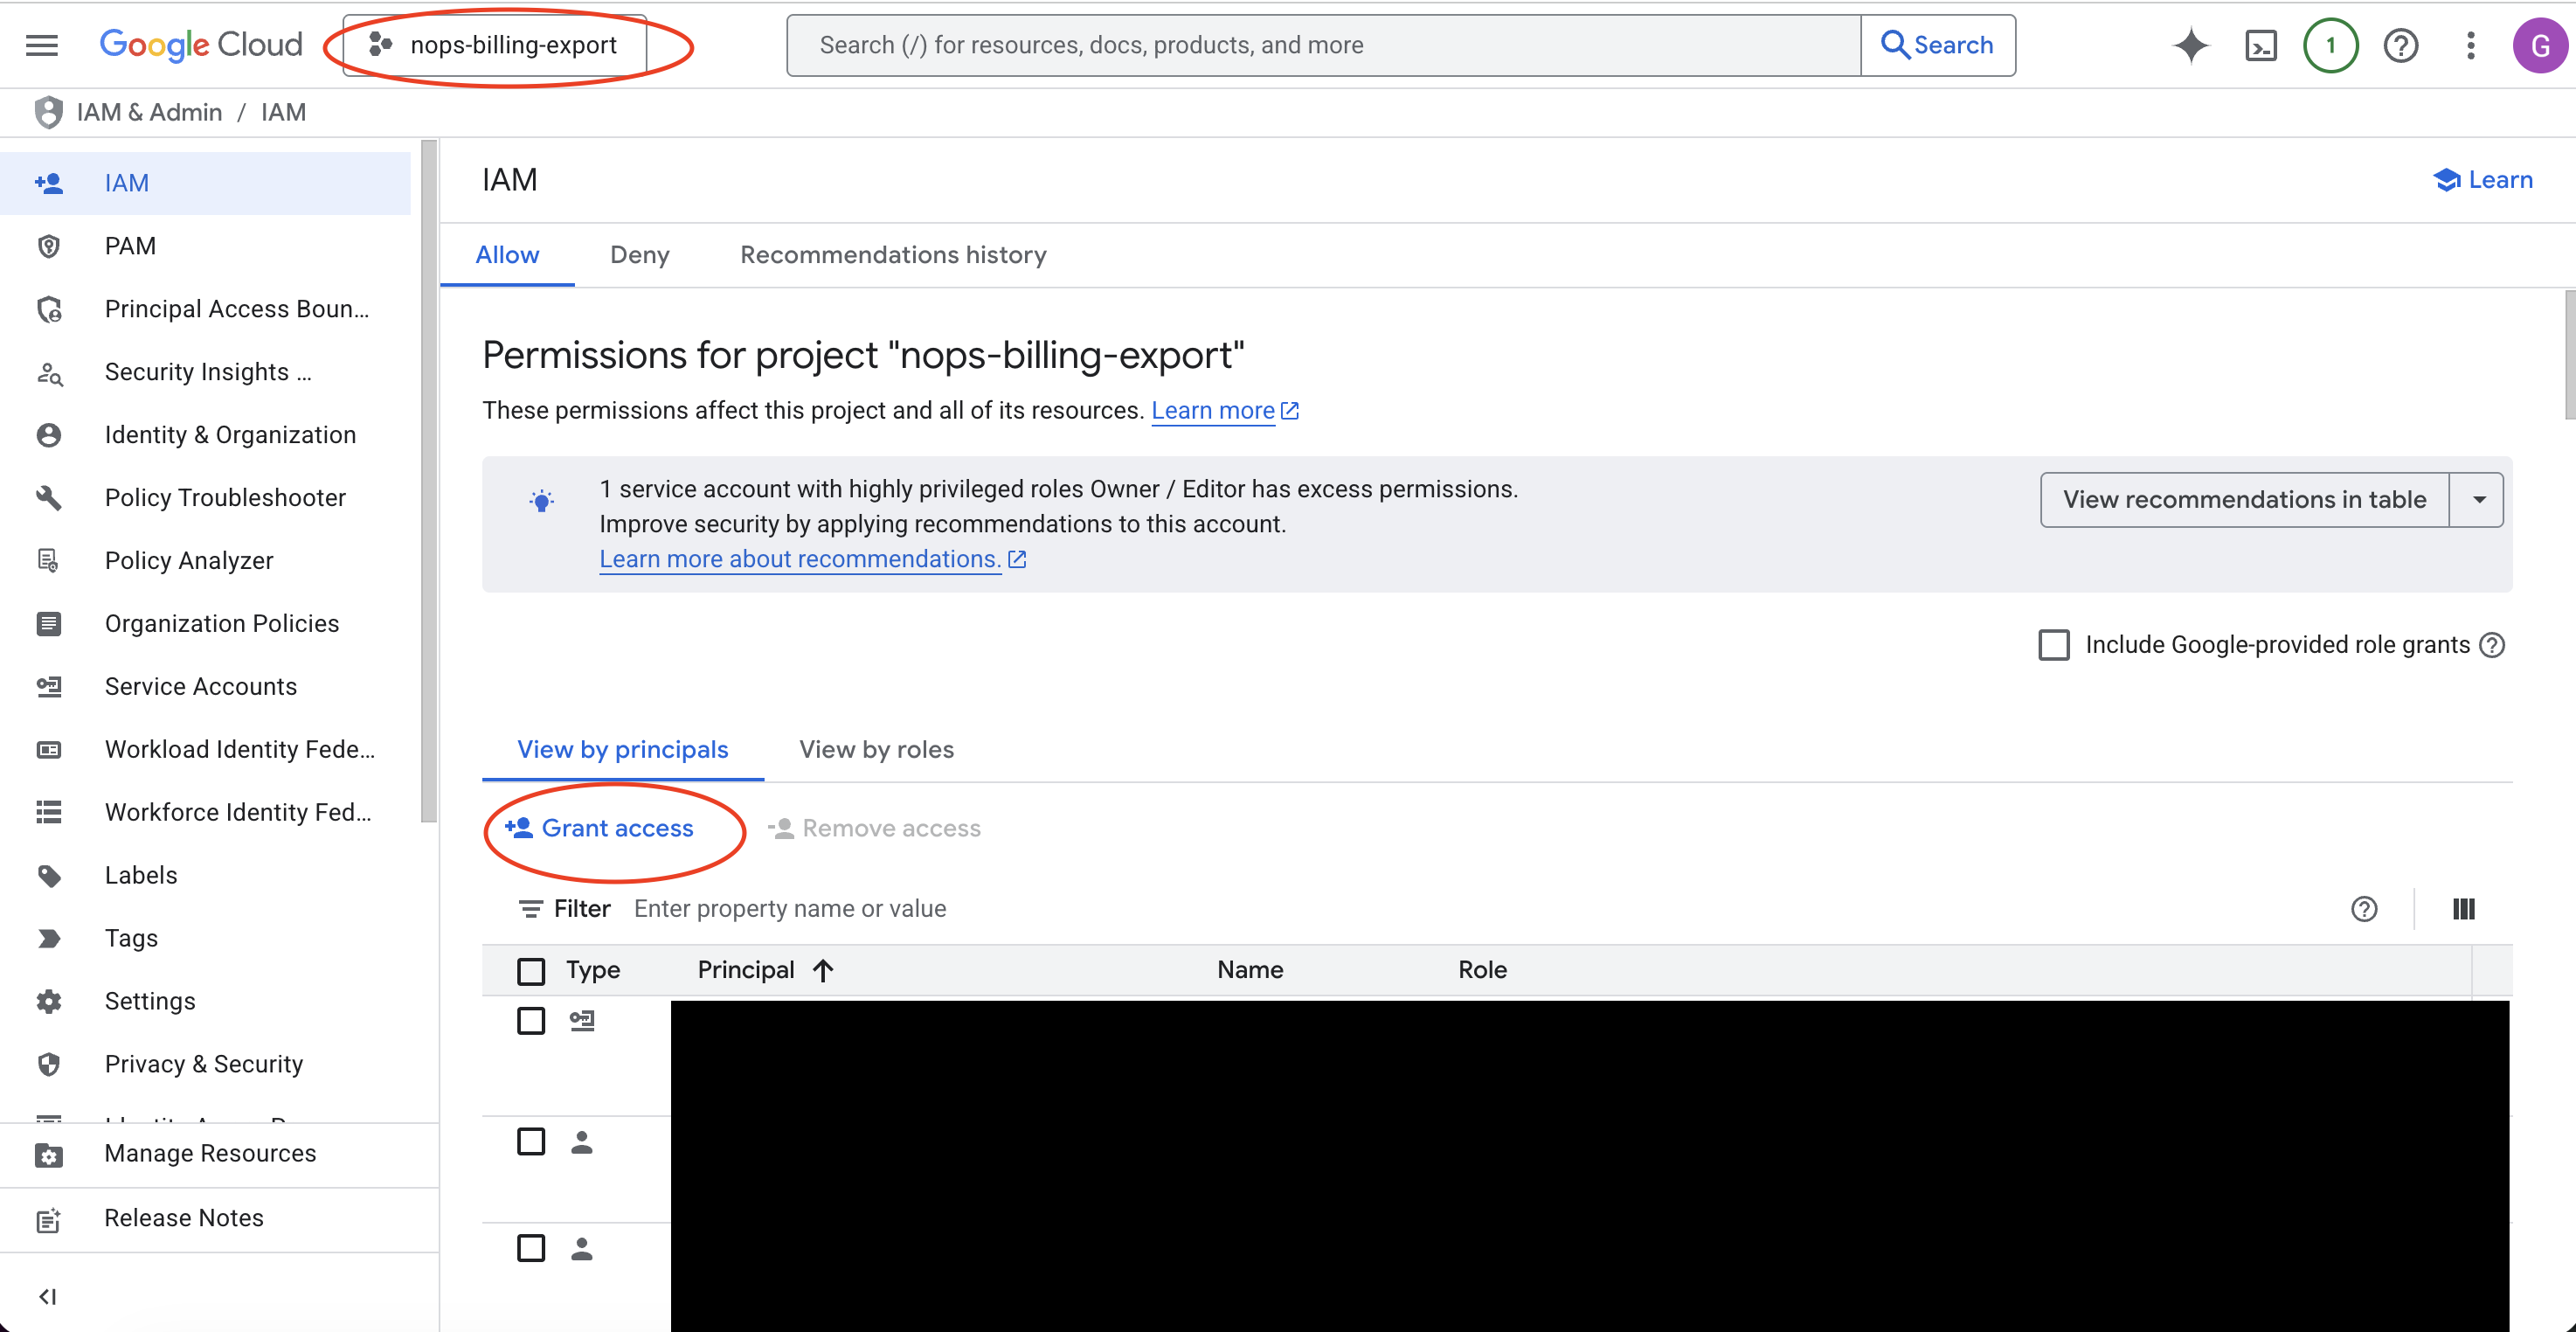
- In the New principals field, enter the nOps service account email.
- Select the role: Service Usage Consumer (
roles/serviceusage.serviceUsageConsumer).
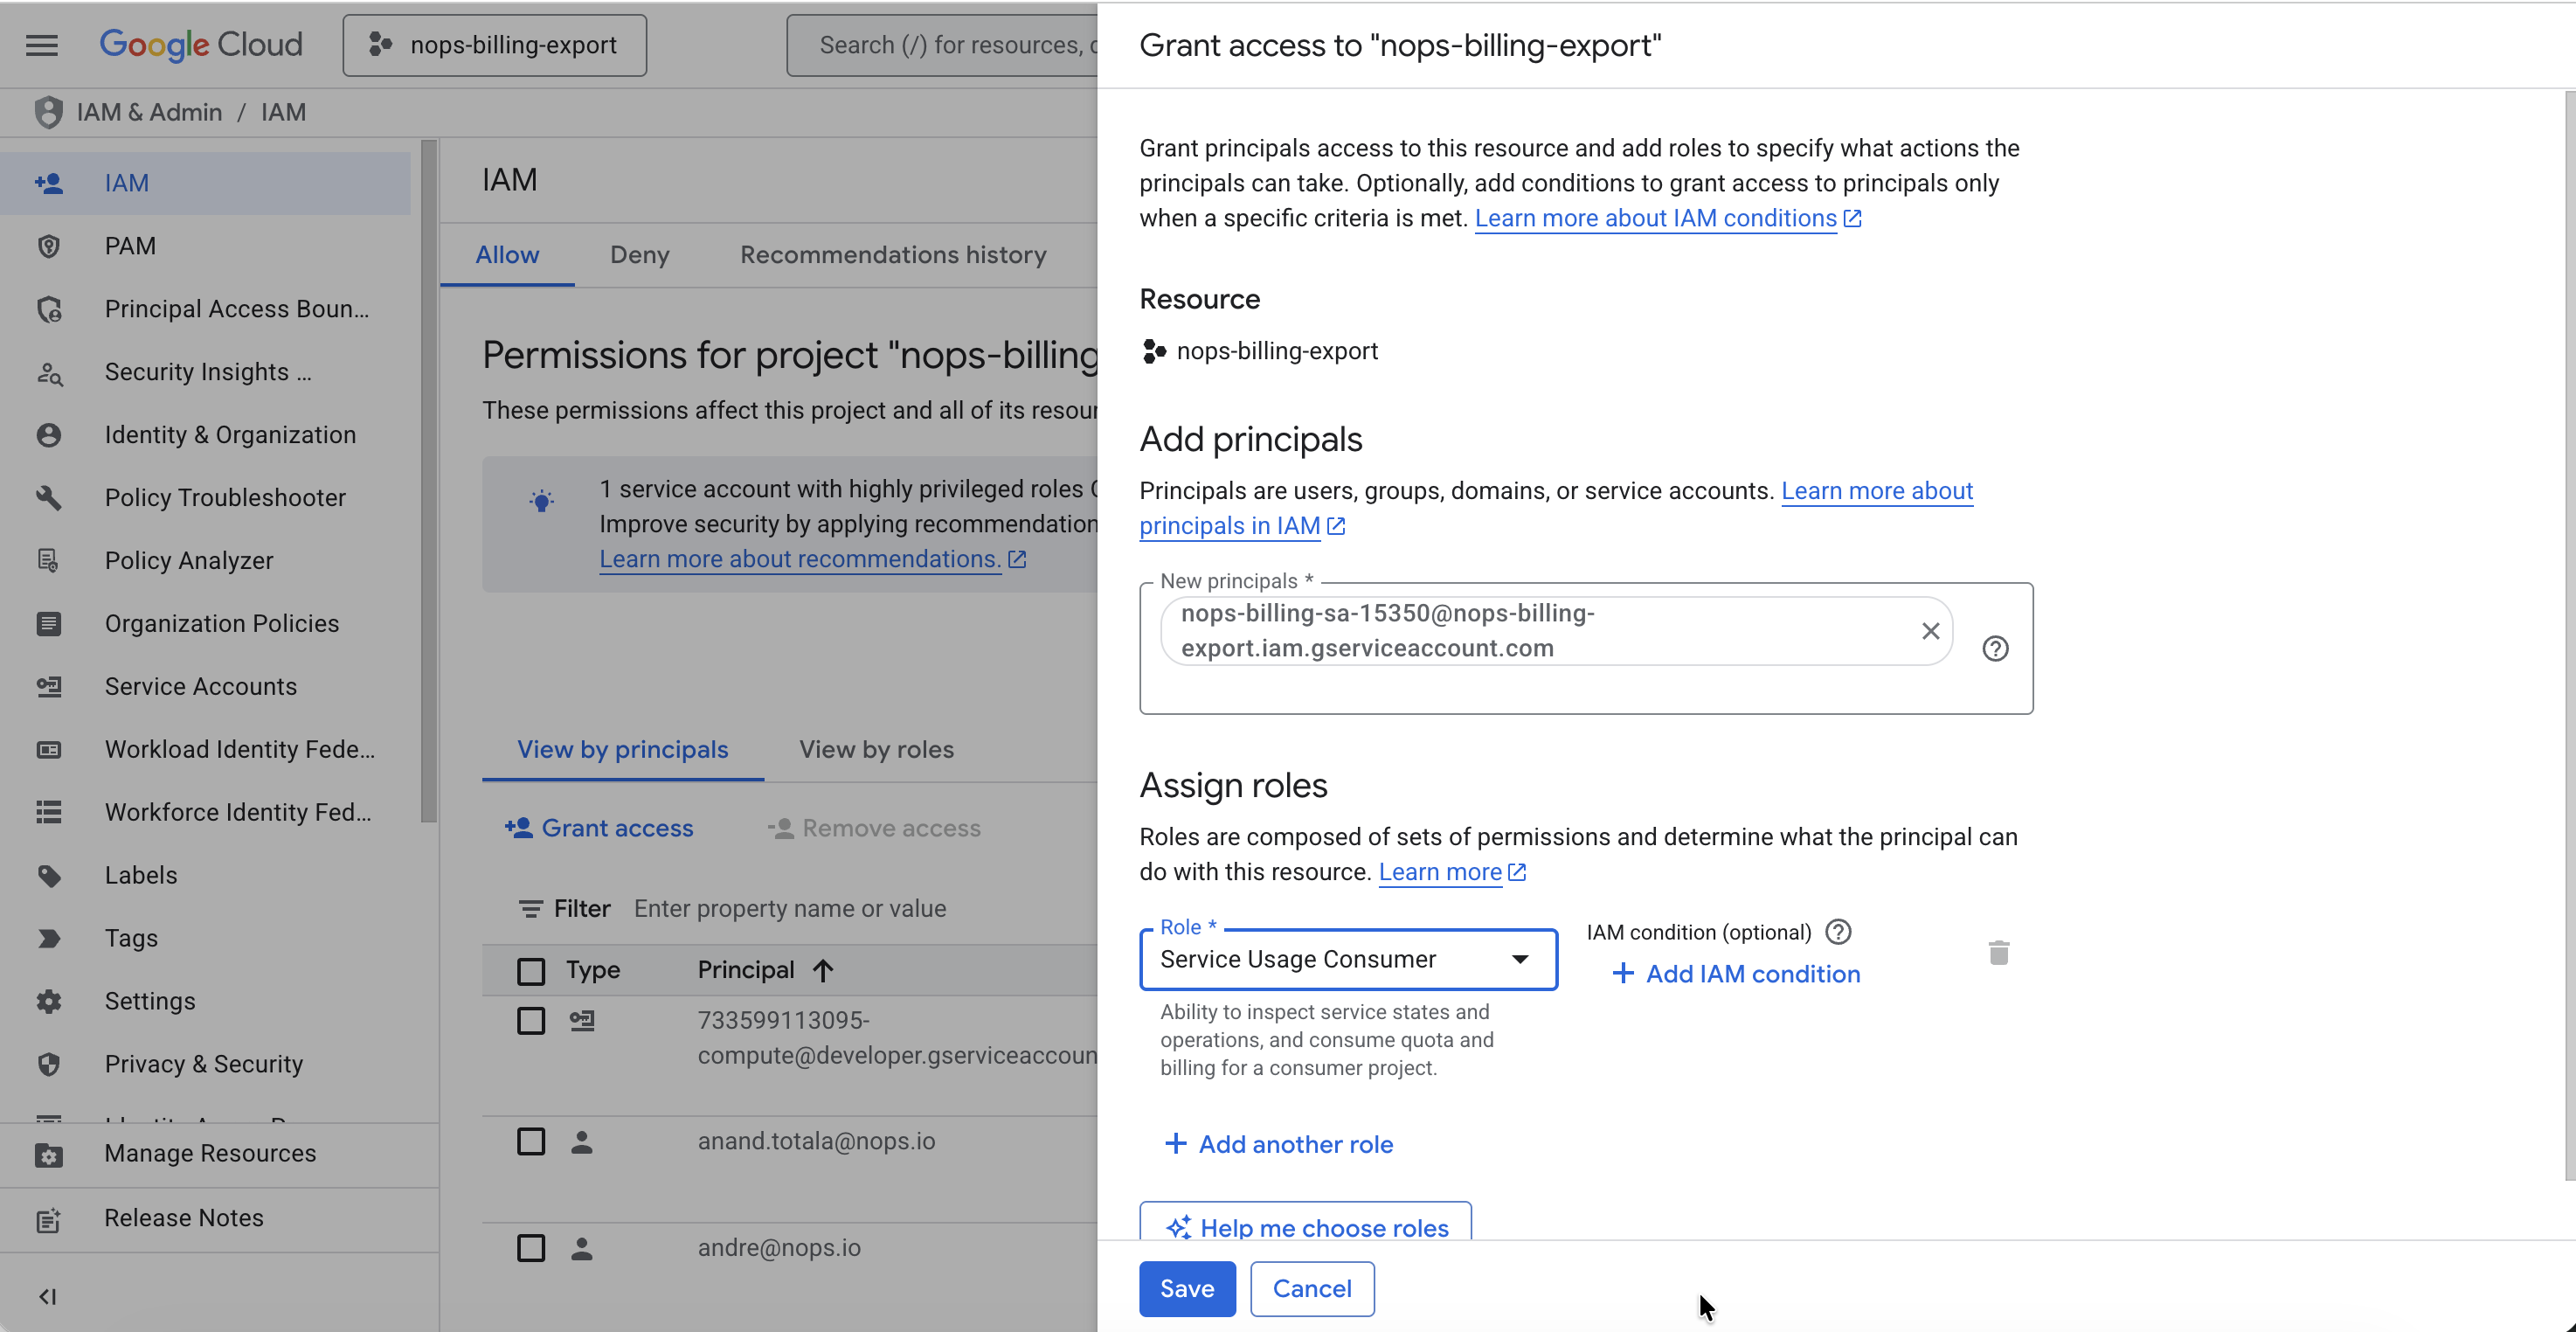
- Click Save.
# Replace with your values
NOPS_SERVICE_ACCOUNT="your-nops-sa@project.iam.gserviceaccount.com"
BILLING_EXPORT_PROJECT_ID="your-billing-export-project"  # The project hosting your billing exports
Grant the Service Usage Consumer role:
gcloud projects add-iam-policy-binding $BILLING_EXPORT_PROJECT_ID \
    --member="serviceAccount:$NOPS_SERVICE_ACCOUNT" \
    --role="roles/serviceusage.serviceUsageConsumer" \
    --quiet
If you used the Terraform module in Section 2A, this step is already complete. The module automatically grants roles/serviceusage.serviceUsageConsumer on the billing export project (derived from your billing_account_id).
E. Project-Level BigQuery Resource Viewer Role (Optional)
Watch: Granting BigQuery Resource Viewer Role
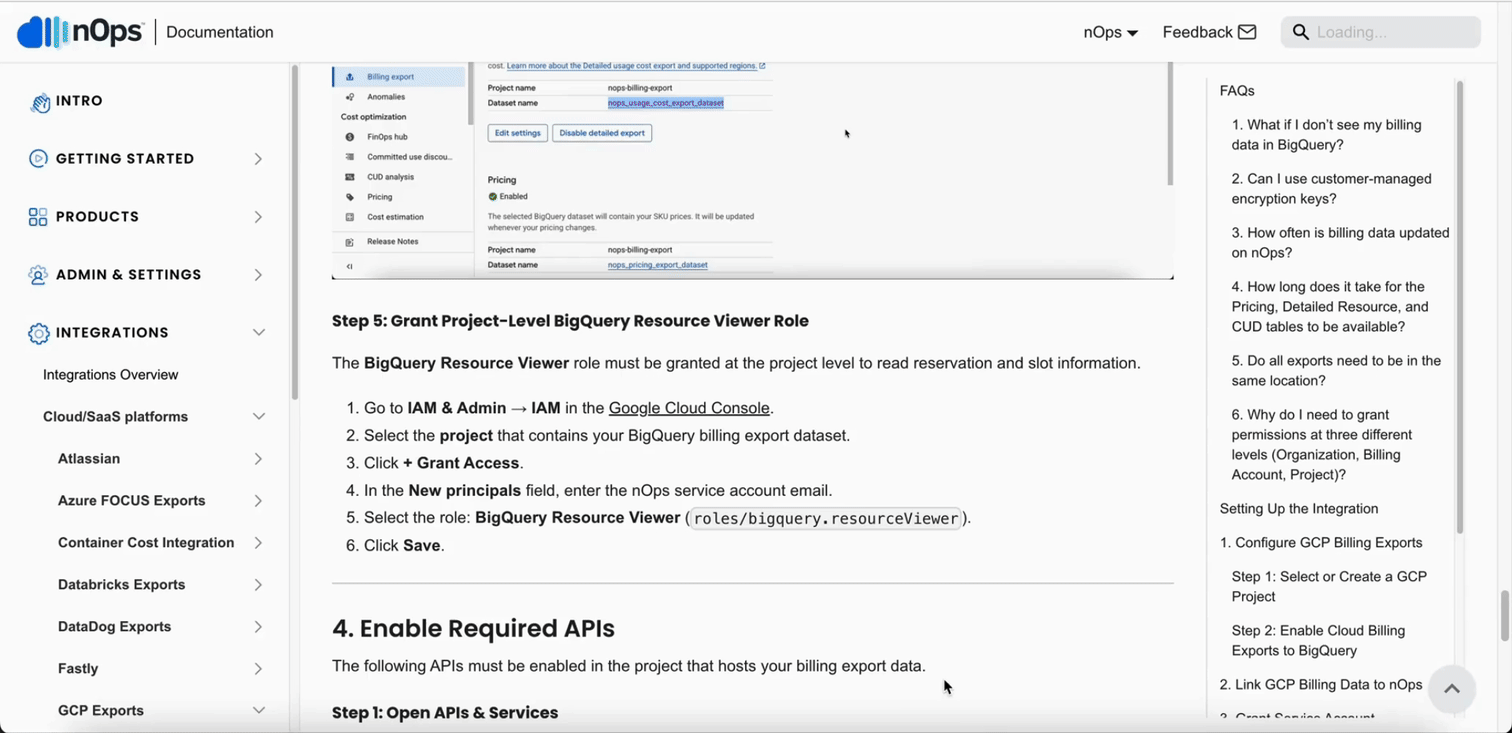
This role is only required if your organization uses flat-rate or reservation-based BigQuery pricing. Most customers use on-demand pricing and can skip this section.
How to check: Go to BigQuery → Administration → Reservations in the GCP Console. If you see reservations or capacity commitments configured, you need this role.
The BigQuery Resource Viewer role allows nOps to read BigQuery reservation and slot information for capacity planning and cost optimization of flat-rate BigQuery workloads.
Role: BigQuery Resource Viewer (roles/bigquery.resourceViewer)
- Console
- gcloud CLI
- Go to IAM & Admin → IAM in the Google Cloud Console.
- Select the project that contains your BigQuery billing export dataset.
- Click + Grant Access.
- In the New principals field, enter the nOps service account email.
- Select the role: BigQuery Resource Viewer (
roles/bigquery.resourceViewer).
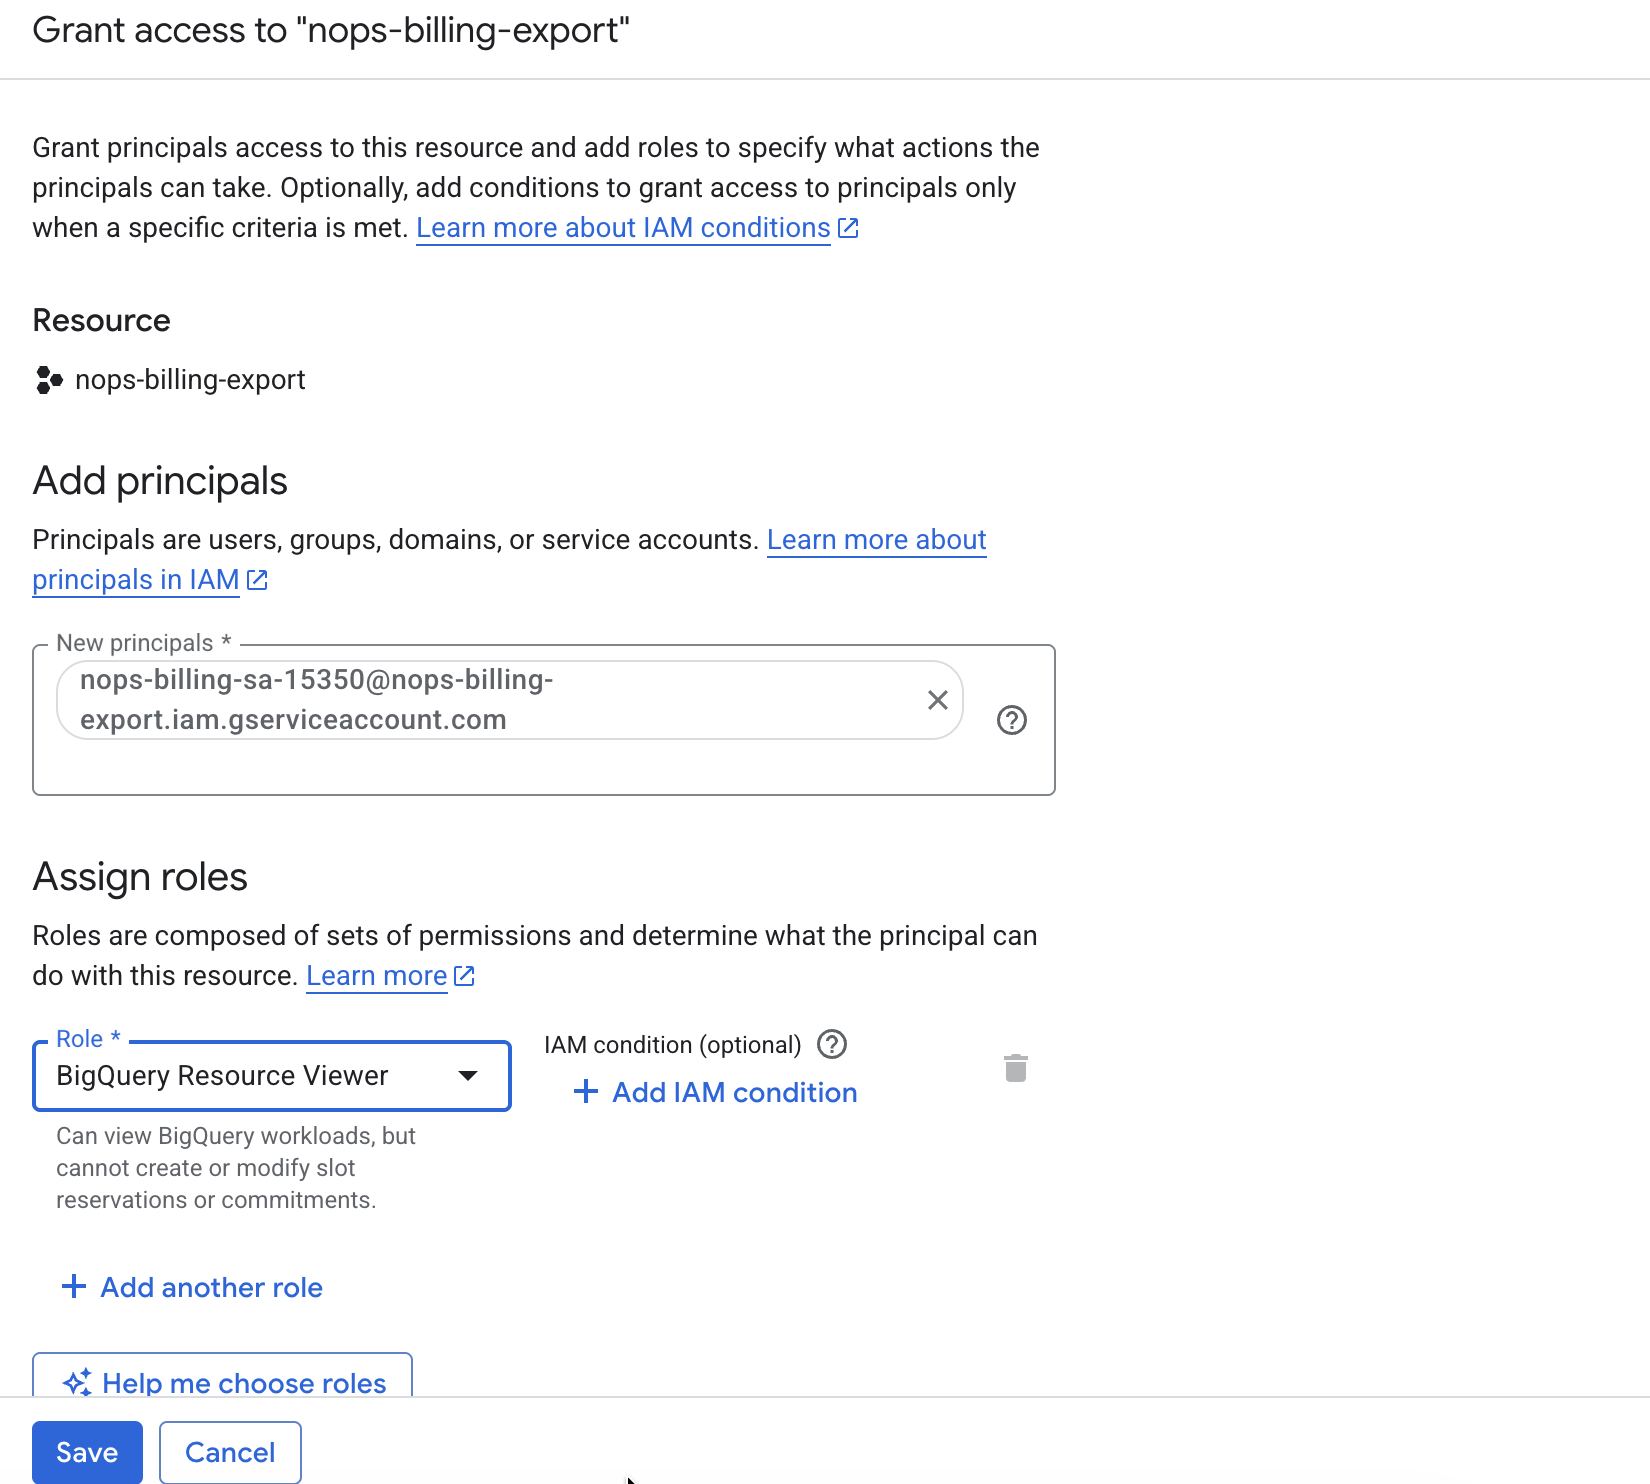
- Click Save.
# List your projects
gcloud projects list

# Replace with your values
NOPS_SERVICE_ACCOUNT="your-nops-sa@project.iam.gserviceaccount.com"
PROJECT_ID="your-billing-project"  # Use the project containing your billing export dataset
Grant the BigQuery Resource Viewer role:
gcloud projects add-iam-policy-binding $PROJECT_ID \
    --member="serviceAccount:$NOPS_SERVICE_ACCOUNT" \
    --role="roles/bigquery.resourceViewer" \
    --quiet
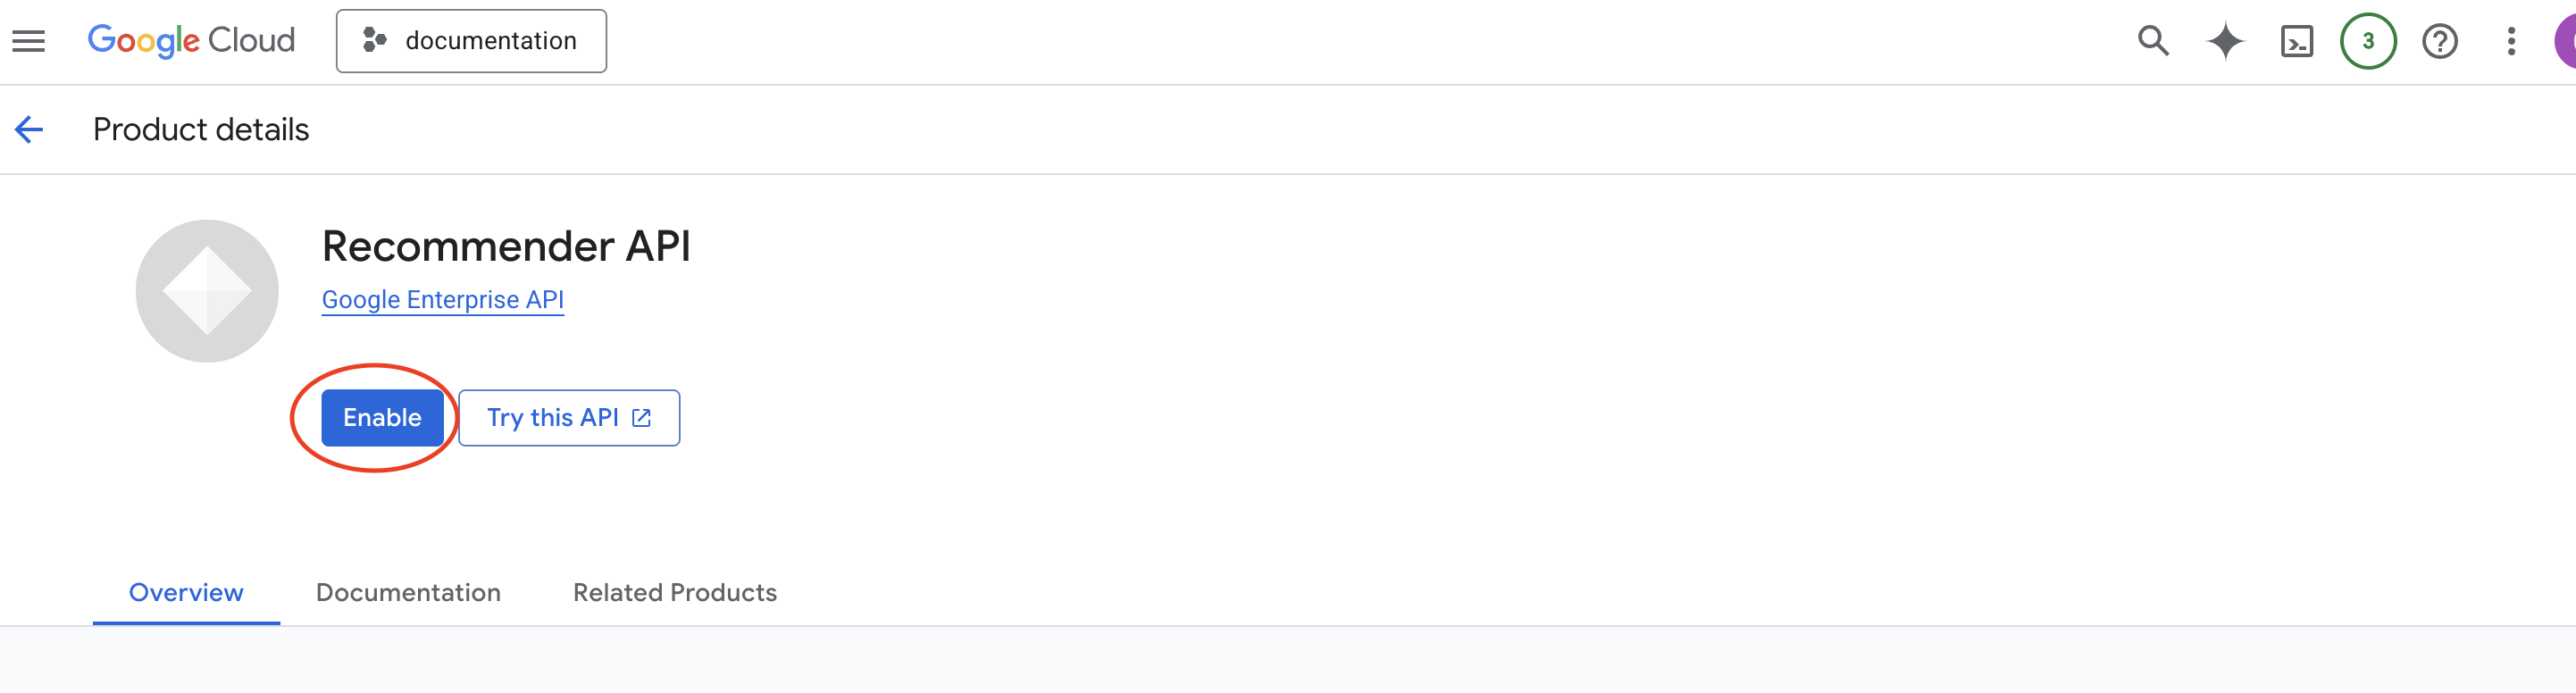
3. Enable Required APIs
Enable the following APIs to allow nOps to collect cost and usage data. APIs only need to be enabled in the project that hosts your billing exports, not across all projects.
Required APIs:
| API | Service ID | Purpose |
|---|---|---|
| Cloud Asset API | cloudasset.googleapis.com | Asset inventory and discovery across your organization |
| Cloud Billing API | cloudbilling.googleapis.com | Billing account access and cost data |
| Recommender API | recommender.googleapis.com | Cost optimization recommendations |
Optional APIs:
| API | Service ID | When Required |
|---|---|---|
| BigQuery Reservation API | bigqueryreservation.googleapis.com | Only if using flat-rate/reservation BigQuery pricing (for capacity commitments) |
- Console
- gcloud CLI
- Terraform
Step 1: Open APIs & Services
- Go to APIs & Services → Library in the Google Cloud Console.
- Select the project that hosts your billing exports from the top dropdown menu.
Step 2: Enable Required APIs
Enable the following APIs in the project that hosts your billing exports:
- Search for Cloud Asset API and click Enable.
- Search for Cloud Billing API and click Enable.
- Search for Recommender API and click Enable.
Only enable the BigQuery Reservation API if you use flat-rate or reservation-based BigQuery pricing. Most customers use on-demand pricing and can skip this.
Enable Required APIs
# Replace with your project ID (the project hosting your billing exports)
BILLING_EXPORT_PROJECT_ID="your-billing-export-project"

# Enable required APIs in the billing export project
gcloud services enable \
    cloudasset.googleapis.com \
    cloudbilling.googleapis.com \
    recommender.googleapis.com \
    --project=$BILLING_EXPORT_PROJECT_ID
Optional: Enable BigQuery Reservation API
# Only if you use flat-rate/reservation BigQuery pricing
gcloud services enable bigqueryreservation.googleapis.com \
    --project=$BILLING_EXPORT_PROJECT_ID
If you used the Terraform module in Section 2A, this step is already complete. The module automatically enables all required APIs:
- Cloud Asset API (
cloudasset.googleapis.com) - Cloud Billing API (
cloudbilling.googleapis.com) - Recommender API (
recommender.googleapis.com)
To also enable the optional BigQuery Reservation API, add enable_bigquery_reservation_api = true to your module configuration.
Why Use nOps for GCP Cost Management?
- Unified Cost Visibility – View all cloud spend, including AWS, Azure, and GCP, in a single platform.
- Automated Cost Analysis – Identify inefficiencies and optimize resource allocation.
- Custom Reporting – Create tailored reports for detailed GCP spend analysis.
By integrating GCP with Inform, you gain deeper visibility into cloud costs, empowering smarter budget decisions.